Showing posts with label C64. Show all posts

Sunday, August 11, 2024

Save capability added to C64 version of VWAS6502 monitor


Save has been added to my 6502 monitor program for the C64 version.  The video above demonstrates creating a very simple 6502 program to output printable characters to the screen, and saving that program to disk.

Loading is not implemented, but you can easily use BASIC for that task as demonstrated.  Not explicitly shown is the X command to exit to BASIC.

The new save syntax is in the following form:

1000.2000 "FILENAME" 08 S

Tuesday, July 16, 2024

6502 Help References included in 6502 monitor

6502 mini-assembler help system

The help system recently added to the 6502 monitor (vwas6502) includes
  • help commands
  • monitor commands reference
  • 6502 instruction set mnemonics
  • 6502 addressing modes references, listing valid instructions
  • opcodes with addressing modes available for a specific instruction mnemonic
In observation, that required a bit of ROM memory.  The monitor is currently at 4K with minimal features.  It is bursting at the seems without further space optimization, so will need to expand to 8K with the next feature additions.

Help commands


Monitor commands reference


6502 instruction set


6502 addressing modes


Help for a specific instruction


The references are possible, because the mini-assembler and disassembler is table driven.  There is a table of instructions in alphabetical order, an alphabetical index of the addressing modes, a table of addressing modes and an example for each in parsing (and number of bytes required) order, and tables of the opcodes: (ordered by) byte values, index to instruction name, and index to addressing mode.

By using the alphabetical indexes, the information can be displayed sorted when applicable.  This makes the information more easily accessible.

The 6502 specific references are generated by 6502 code on demand from the tables.  The commands reference and help about help are the only static help pages.  It would probably take a lot more storage if all the references were static, especially considering there are 56 separate instructions.

More information about this monitor is available in the previous article.

Friday, July 12, 2024

Mini-assembler with disassembler, display, edit, and run


Sample assembly entry and run example

Links
  • Source at github
  • D64 and PRG from github (Commodore 64)
  • BIN for ROM (minimum system 6502 + MC6850 + RAM + ROM)

Everyone (in a small corner of the retro programming community) has their favorite machine language monitor.  Mine is HESMON for the Vic-20 which I got in the early 80s.  I probably also used TinyMon, and have used SuperMon in recent years.  The VICE monitor (ALT+H) is great, especially like the symbolic label support which I use to debug my programs assembled with ACME.  Also the Commodore monitors are great too, including Commodore 128 and Plus/4 (and family).

But recently I've been playing with WozMon, both in a a minimal emulated 6502 system, and compiled for Commodore.  But I didn't have a great disassembler and assembler to go with it.   I looked around a little (probably not enough).

My programming brain and fingers were itching to build my own.  So I set out to prototype the assembler portion in C#, the disassembler in 6502 using tables generated by the C# experience, and finally created a wozmon compatible monitor in 6502 with both disassembler and mini-assembler as we see here today.

Let's cover the syntax briefly.

Display memory is a single address (up to 4 hex characters) either by itself, or two addresses separated by a dot for a range of memory.  Below we are looking at the C64 jiffy clock by entering "A0.A2".   The result is the starting address followed by a colon and three bytes of memory from that range.


Modify memory is similar to the output of display memory, but you enter it.  (No I didn't implement the Woz's feature of showing the previous value of the first address.  Probably nice to add later.)   Either a single byte, or multiple bytes may be entered and stored into memory at the specified address.


Run program is a hex address followed by R.   Note that an RTS will usually return to BASIC.  And a BRK will perform the normal screen reset routine.   So best bet for now is to JMP $C000 to return to the monitor (if you wish).   Or if you want to reset the C64...


Those are the commands I stole from WozMon.   (To be clear, I didn't steal the code, just the syntax.  This is my code.)  To continue the excitement of working with WozMon.  With the interest of creating something bigger and better.  Oh joy, more generic machine language monitor commands.   Yes!  You guessed it!

Disassemble is similar to the run command, just change to a D


Assemble is where the exciting things start to happen.  Use A after an address to start writing your own programs in 6502 assembler.


And look what an exciting program this is!   Nearly(*) at the speed of light, it is outputting the first three numerals before restarting the monitor.   Wow!   I am speechless.   (*)I may be too excited about this.

There you have it!   An assembler, disassembler, memory display, editing, and running.   What else could you ask for?

Program loading and storing?

Oh excuse me, I must be going now.   Can't quite hear you.   Enjoying the spendor and excitement of new features.   Ah, while I bask in the glory of greatness.  Let me enjoy this, will you?

Later  dudes!

Update 2024-07-14 The project now also builds a ROM image for a bare-bones 6502 system with MC6850 UART.  The source code has conditional compilation for portions whether the system is first a Commodore 64 with full screen editing, secondly only using the get key routine terminal style (used as stepping stone to...), and lastly the minimum 6502+6850MC.  Also is an option whether to echo keystrokes back to the terminal.   The monitor with mini-assembler and disassembler is now available to more easily port to other 6502 systems!

6502+MC6850 emulated system debugging its own input line routine

Tuesday, July 9, 2024

Disassembler for use with WozMon


Disassembler disassembling WozMon

WozMon is a great little monitor program in 256 bytes which Steve Wozniak wrote for his Apple 1 release in 1976.  It was small but powerful allowing for memory inspection, entry of 6502 machine code programs and bytes, and launching of programs in ROM and RAM (jumping to address).

But being small, it is missing features that monitor users have learned to depend on, including a mini-assembler and disassembler.

So here I am today presenting a disassembler I wrote for 6502 which can be integrated with WozMon run command.  Once the disassembler gets control, the Y register contains a pointer to the last character read from the input buffer, and continues parsing for a hex address.  If not found, it simply returns to WozMon.  But if found, it will disassemble 20 statements starting at that address.  (Note: Vic-20 port above, changed to 17 statements due to the smaller screen size).

The syntax may be lengthier than other monitors, but it allows for an integration with the normally ROM based WozMon without modifications.  Plus you get what you pay for.   The disassembler is open source, so feel free to change it.

The disassembler came into being as part of developing a mini-assembler.  First I'd written a prototype in C# .NET. 

The assembler included tables of information for the 6502 instruction set and addressing modes that lent itself to be used as a disassembler (came second) which was prototyped as a 6502 program that disassembles itself.  Third came the disassembler compatible for use with WozMon.

Each prototype and program is one step along the way for the goal of creating a mini-assembler for my 6502 minimal system.  Not there yet, but getting closer with each step!

Also works with original WozMon in Apple 1 style environment

Also works on C64 and C128 systems


Wednesday, June 12, 2024

Strings or Compact directory utility for C64


Directory listings scrolling by too fast?  Want to scan program for string literals?  Here's a stupid (sometimes useful, definitely ugly) utility I created in the monitor for both scenarios.  Compact display and pauses every 24 lines.  Attempts to avoid control characters.

Note: operates on whatever loaded program is in memory, assuming BASIC. 

Shown loading into tape buffer (828), can be relocated. 

This source is an example of parsing a BASIC program.  The beginning of BASIC is grabbed from $2B/2C, and each line of the program is iterated through traveling its linked list ending with a null pointer.  In each line, a string starts with double quotes and ends with double quotes or end of line (zero or nul character).  Multiple strings per lines are possible.   Other memory addresses used include toggling the reverse flag ($C7), setting quote ($D4) and insert ($D8) modes, and counting each time at the left column ($D3).  Outputs string characters via $FFD2, and waits for a key press via $FFE4.

This is a short program that can be studied.  I hope you find it useful and informative.  Enjoy!

Links:
  original (compact) strings.prg
  updated (one line) strings.prg
  source at github

Copyright (c) 2024 by David R. Van Wagner
MIT LICENSE

UPDATE: (September 3, 2024) compact version was too ugly for me.  Have since updated source to display one string per row of the screen, with an option (POKE 951, 96) to revert to compact functionality.   See updated links above.

Sunday, June 2, 2024

BANKTEST for C64

While adding banking support to my own C64 emulator back in the good 'ole days (April 14, 2020, maybe only good for hunkering down on retro stuff), I also wrote a test program to help verify the results.  This may help you visualize how you can access more RAM and ROM on the C64.

The program works by switching to the RAM only bank writing a signature high byte to four addresses, then cycles through the standard list of banks reading the value at those locations.  Of course the first line for bank zero shows the bytes as expected.  But the other banks tell a different story.

A000-BFFF is BASIC ROM.   Appears ROM is active in banks 3 & 7 only, otherwise is RAM.

C000-CFFF is always RAM.

D000-DFFF is usually I/O (banks 5-7) including color RAM at D8000 (notice the high nibble changes in this run).  May also appear as RAM (banks 0 & 4), CHAR ROM (banks 1-3).

E000-FFFF is BASIC ROM (banks 2, 3, 6, 7), otherwise RAM (banks 0, 1, 4, 5).

It is interesting to see the similarities and differences in this chart.

The key code to switching banks includes

        sei

        lda $01

        and #$f8

        ora #bank_selection

        sta $01

        rts

Only clear the interrupt flag (cli instruction) once you have returned to the normal bank (7) so IRQ vectors and the KERNAL/BASIC ROMs will work as expected.

I have also color encoded the banks in this chart to represent their effects:

Links

Sunday, May 26, 2024

LCD version of 6502 emulators ported to Windows


LCDs and Windows too!

Now the c-simple-emu6502-cbm unified branch that works with LCD systems has been ported to Windows!  This is an emulator that includes a feature to switch between various popular Commodore 8-bit models from the BASIC prompt.

You may ask yourself, hey self, wasn't Windows already a supported system?  And you could answer, yes self, it was.  But only in text mode.  If you wanted to run Commodore BASIC from a command prompt, yes you could do that.  If you wanted to run this emulator with the nifty "GO 128" command in a graphical environment you were required to use those smallish LCDs (well the 7" isn't too smallish).

Now, by porting this C++ project back to Windows again, using GUI elements, it can now look more like a Commodore.  The fully resizable window, and keyboard support make it feel like you have a Commodore right in front of you.  You virtually do!

For now, you need to compile the project in Visual Studio 2022 (Community Edition should work just fine).  It probably also works from Visual Code, but I haven't attempted that yet.

Dependencies include a roms folder (see README.md), optional disks/drive8.d64, and optional disks/drive9.d64

The purpose of this is to ease development of new features, utilizing the feature rich Visual Studio IDE including debug support.

The benefits to other users include being able to test drive the project in an environment they already have - their existing Windows desktop or VM.   And if you love it and think you may enjoy a portable version, you can then invest your dollars into an LCD solution via various online retail websites.   There may even be a search engine out there to help you too.

Are you keeping up with Commodore?  Happy computing!  Spend that money wisely.

Wednesday, May 1, 2024

C64 RAM locations for programmable characters


Taking the information from Jim Butterfield's interactive program we can determine a few optimal choices for configuring the location of video and character set memory.  They both need to be in the same 16K bank of the C64 memory, video memory needs to be accessible to the KERNAL, and some locations are off limits (offsets $1000-$1FFF within VIC-II 16K banks 0, 2) because the VIC-II only sees D000-DFFF ROM characters there.

Option 1: easiest, video $0400, chars $2000-$2FFF

Option 2: least BASIC free, video $8C00, chars $A000-$AFFF

Option 3: largest free, video $CC00, chars $F000-$FFFF


Option 4: single charset, video $C400, chars $C800-$CFFF


Thanks to Jim Butterfield's SCREENMAP 64 program, it prompts for you to choose between valid options, and then calculates the register and screen page values that you need to change(poke).  Shown above are details for the four options that seem best.  The first three allow for two full sets of characters.  The last one allows for a single character set, or one and a half character sets.

In addition to the steps shown, it may be necessary to install an NMI handler to keep the values set instead of reset to ROM defaults, and it will be necessary to load a font into the desired programable character set address range.

Options 3 and 4 are interesting because they both increase BASIC RAM by 1K more than normal by moving video screen memory elsewhere. Option 1 is the easiest to implement, so is perfect for getting started.


Notes:

1000-1FFF not available for VIC because maps to D000 ROM
5000-5FFF not available for VIC because maps to D000 ROM
9000-9FFF not available for VIC because maps to D000 ROM
D000-DFFF not available for VIC because maps to D000 ROM

C000-CFFF not recommended for prog. chars. because other RAM in that bank not usually available to KERNAL needed for video screen characters.   So if screen characters are there, only room for one set (2K) instead of two sets (4K)

Option 0 (Normal)
0400-07FF screen memory (1K) = 1024
0800-9FFF BASIC RAM (38K) 
C000-CFFF free (4K)
D000-DFFF character ROM banked under I/O

Option 1 (First 16K)
0400-07FF screen memory (1K) = 1024
0800-1FFF free (6K)
2000-2FFF prog. chars. (4K) = 8192
3000-9FFF BASIC RAM (28K)

4000-7FFF is smack dab in the middle of BASIC RAM, seems like a bad idea unless used with 6502 machine language or other assets around it, and not strictly BASIC.

Option 2 (Third 16K)
0400-8BFF BASIC RAM (34K)
8C00-8FFF screen memory (1K) = 35840
9000-9FFF free (4K)
A000-AFFF prog. chars in RAM bank under BASIC ROM = 40960

Option 3 (Fourth 16K)
0400-9FFF BASIC RAM (39K)
C000-CBFF free (3K)
CC00-CFFF screen memory (1K) = 52224
E000-EFFF = 57344 prog. chars in RAM bank under KERNAL ROM *or* F000-FFFF = 61440 *or* under CHAR ROM D000-DFFF = 53248

Option 4 (Fourth 16K)
0400-9FFF BASIC RAM (39K)
C000-C3FF free (1K) or half lowercase character set (no inverse characters)
C400-C7FF screen memory (1K) = 50176
C800-CFFF prog. chars (1 set, 2K only) = 51200


Tuesday, April 30, 2024

Raster Interrupts for C64


The VIC II chip (video IC) that gives the C64 a lot of its characters (pun intended), includes registers to set up interrupts at certain raster lines.  This allows for video tricks.  Above the background color is changed in the middle of the screen, and changed back when in the borders before drawing the screen again.


This code was leveraged from my character editor source for c64.  That project needed to display multiple different character sets (from ROM and RAM) on the screen simultaneously.   And that is described at the bottom of an earlier blog post.

My approach was to launch Vice x64sc (Commodore 64 emulator) and utilize its built in monitor (ALT-H) to craft prototype code.  The listings following are what I came up with.   Then I used the clipboard to move to a source editor, added labels, and further refined to change from background colors to font changes.

Written by Dave VW 2024-04-27

*** NOTE THIS IS THE ROUGH DRAFT
*** SOURCE CODE AT GITHUB IS MUCH CLEANER
*** ASSEMBLY SOURCE INSTEAD OF MONITOR LISTING

This part was created in the monitor...

>C:c000  2c 19 d0 10  44 ea ad 19  d0 29 01 f0  3b 2c 00 c1
>C:c010  30 16 10 60  ea a9 00 8d  12 d0 ad 11  d0 29 7f 8d
>C:c020  11 d0 0e 00  c1 4c 3b c0  ce 21 d0 a9  a4 8d 12 d0
>C:c030  ad 11 d0 29  7f 8d 11 d0  4e 00 c1 a9  01 8d 19 d0
>C:c040  ea 68 a8 68  aa 68 40 00  ea 4c 31 ea  a9 40 8d 00
>C:c050  c1 78 a9 80  8d 12 d0 ad  11 d0 29 7f  8d 11 d0 a9
>C:c060  00 8d 14 03  a9 c0 8d 15  03 ad 1a d0  09 01 8d 1a
>C:c070  d0 58 60 00  ad 12 d0 c9  c2 90 f9 a2  0a ca d0 fd
>C:c080  ee 21 d0 4c  15 c0                                

.C:c000  2C 19 D0    BIT $D019
.C:c003  10 44       BPL $C049
.C:c005  EA          NOP
.C:c006  AD 19 D0    LDA $D019
.C:c009  29 01       AND #$01
.C:c00b  F0 3B       BEQ $C048
.C:c00d  2C 00 C1    BIT $C100
.C:c010  30 16       BMI $C028
.C:c012  10 60       BPL $C074
.C:c014  EA          NOP
.C:c015  A9 00       LDA #$00
.C:c017  8D 12 D0    STA $D012
.C:c01a  AD 11 D0    LDA $D011
.C:c01d  29 7F       AND #$7F
.C:c01f  8D 11 D0    STA $D011
.C:c022  0E 00 C1    ASL $C100
.C:c025  4C 3B C0    JMP $C03B
.C:c028  CE 21 D0    DEC $D021
.C:c02b  A9 A4       LDA #$A4
.C:c02d  8D 12 D0    STA $D012
.C:c030  AD 11 D0    LDA $D011
.C:c033  29 7F       AND #$7F
.C:c035  8D 11 D0    STA $D011
.C:c038  4E 00 C1    LSR $C100
.C:c03b  A9 01       LDA #$01
.C:c03d  8D 19 D0    STA $D019
.C:c040  EA          NOP
.C:c041  68          PLA
.C:c042  A8          TAY
.C:c043  68          PLA
.C:c044  AA          TAX
.C:c045  68          PLA
.C:c046  40          RTI
.C:c047  00          BRK
.C:c048  EA          NOP
.C:c049  4C 31 EA    JMP $EA31
.C:c04c  A9 40       LDA #$40
.C:c04e  8D 00 C1    STA $C100
.C:c051  78          SEI
.C:c052  A9 80       LDA #$80
.C:c054  8D 12 D0    STA $D012
.C:c057  AD 11 D0    LDA $D011
.C:c05a  29 7F       AND #$7F
.C:c05c  8D 11 D0    STA $D011
.C:c05f  A9 00       LDA #$00
.C:c061  8D 14 03    STA $0314
.C:c064  A9 C0       LDA #$C0
.C:c066  8D 15 03    STA $0315
.C:c069  AD 1A D0    LDA $D01A
.C:c06c  09 01       ORA #$01
.C:c06e  8D 1A D0    STA $D01A
.C:c071  58          CLI
.C:c072  60          RTS
.C:c073  00          BRK
.C:c074  AD 12 D0    LDA $D012
.C:c077  C9 C2       CMP #$C2
.C:c079  90 F9       BCC $C074
.C:c07b  A2 0A       LDX #$0A
.C:c07d  CA          DEX
.C:c07e  D0 FD       BNE $C07D
.C:c080  EE 21 D0    INC $D021
.C:c083  4C 15 C0    JMP $C015

The initialization routine is at $c04c to install the new IRQ handler $c000.  The code jumps around a bit and has NOP (no instruction) as a by-product of patching the source in the monitor to get the desired functionality.   This is cleaned up a lot more in the sources to both repos.

Wednesday, February 7, 2024

Calculator for Commodore 64 and other CBM BASIC models


Introduction

Wow! A new desktop calculator for Commodore.  Programmed all by myself in BASIC.  Wow, so impressed!   Or not.  Doesn't even have decimals.

No, it's not the best thing since sliced bread, but it was fun.  And it's just a start -- there's a bigger goal I'll get to in a while...

This was a puzzle programming exercise I challenged myself with.  How to make the calculator, especially with the operator precedence feature.

Link: LOAD"CALC64",8

Implementation

Let's go through how it was implemented.

User Interface

First was the design of the user interface, by creating PRINT statements.  Used reverse text to make a rectangular box with the keys displayed.

How to click on a key?  I'm so used to a mouse or touch interface.  Oops, Commodore doesn't have that usually, or not so easy.  Ignoring the 1351 mouse for now.   Most Commodore users are used to using the keyboard or joystick.  Forget the joystick, this is not a game!  Keyboard entry one key at a time will do just fine.  Note that ENTER also acts as =, and DEL is equivalent to ←, and X is a synonym for *.

Entry of digits was the first processing, accepting up to the limit of the display.  This stored as a string (V$) with keyed entries appended.

I started with 7 digits, but outgrew that in testing and increased to 9 digits.

At first, only positive numbers were supported, then fixed it to support negative numbers, with the negative sign taking up a position in the display.   The N key toggles a number entry between positive and negative and back again.

Entries allowed by this calculator are interleaved numbers and binary (two argument) operators.  Note that immediate operators like C and N usually take effect immediately, whereas binary operators require multiple arguments and a finalization (another binary operator or =).

There are exceptions allowed in entries to overwrite the prior value or the prior operator.   Examples:

  • 1+1=3 keyed entries will replace the 2 with a 3
  • 2+x3 will replace the addition operator with multiplication operator

Precedence needs a Stack

One design requirement I set for myself was to include operator precedence.  This means that multiplication and division have the same higher precedence over addition and subtraction at the same lower precedence.  Usually math is evaluated left to right, but due to precedence issues, other operators may need to be done first.  In other words the expression 1+2x3 is equivalent to 1 + (2x3) and then 1 + 6 and finally evaluates to 7.   But 1 x 2 + 3 is equivalent to (1x2) + 3, then 2 + 3, and finally 5.

I simply put numbers and operators interchangeably on a stack in order of entry until enough information is present to start evaluating.

Rule 1 - if user presses =, then evaluate

Rule 2 - if first operator is multiplication or division, once the second number is finalized with a second operator, simply evaluate the first expression

Rule 3 - if first operator is addition or subtraction, defer until the second operator and third number is finalized (third operator present!), then figure out what to do - either evaluate first or second expression, reducing the work

The stack is implemented as a count C, and an array of strings S$, which is expected to only grow up to 6 items (0..5), example C=6, S$[0]="1" [1]="+" [2]="2" [3]="*" [4]="3" [5]="+"

This example 1+2*3+ is reduced to 1+6+ and then to 7+, with the display updated to show the 7, but then wiped to disallow appending to it.


And no, I'm not doing RPN.  I didn't grow up with an HP calculator, nor am I implementing one today.  I grew up with Texas Instruments, and that's how my brain works.   Keeping it in entry order keeps it orderly for me.  Sure, there are other was to approach it.   This is BASIC, not Lisp.  And this is MY calculator, so I'm doing it MY way.  Others can follow their own paths.

Expression evaluation includes handling the equals = operation.  In the context of this calculator, that finalizes a calculation, meaning the user wants the result now.

Subroutines

There are several subroutines: 1) Evaluate and reduce stack, 2) Update display, 3) Display stack, 4) Evaluate simple expression involving two numbers and an operator.

That last subroutine is a diagnostic useful most for development, but also shows work in progress compared to a regular simple desk calculator that usually won't show pending work.

Error conditions

Overflow is when the number to be displayed doesn't fit in the 9 digit display, when the string representation of the number is long than 9 characters and/or larger than the maximum whole integer value that can be displayed in that space.   Note that the number is still internally represented and can still be acted on.  If a resulting answer can be displayed it will be (example: divide a ten digit positive number by 10).

Error indicates that division by zero was attempted.

Limitations

Only integers are supported.  No decimal numbers.  No currency.   Workaround required to calculate a percentage -- multiply by one hundred first, then divide by whole percentage.  And division results in a whole number so 1/3= results 0, and 5/2= evaluates to 2.

Non-negative numbers are limited 0 to 999999999 (nine digits).  Negative numbers are limited -1 to -99999999 (note only 8 digits).

Scientific notation is not supported.

No paper tape, no printout, no record of operations.

Limited user feedback.  No keypress indicators.

Stack diagnostic is a little technical, especially with a count, then colon, and the entries.  (Could eliminate the count and colon, and/or show previous and pending operators before and after the display.)

Keyboard entry.

Extras

The program was saved with a starting address $400, to support PET, so you must not load with secondary address 1 on a C64!  And while the program assumes a screen bigger than a VIC-20, a few minor changes to the margin and startup text can remedy that.

Next

What does the future hold?  Who can predict with any accuracy?  I can say anything here, but doesn't mean I'll follow through.  I originally was contemplating near limitless number of digits (considering the 8-bit platform, probably some 16-bit limitation).   Maybe binary and hex?   Maybe a scientific calculator?   Fixed decimal?   Near limitless decimals?   Port to assembly for fun!   We'll see...

Have fun calculating!

Saturday, December 9, 2023

Commodore keyboards go wireless for my portable emulators

The c-simple-emu6502-cbm project supports a number of ESP32 platforms to provide a subset of Commodore C64 (and Vic-20, C128) emulation, and many currently include BLE keyboard support.  Originally for CardKB only, now I have added BLE support for Commodore keyboards (20 to 25 pins) to the m5, T-Display-S3, and ESP32-8048S070-7inch ports/branches into the encapsulated BLE_commodore_keyboard_server Arduino sketch.

BLE options: (a) Commodore keyboard (b) CardKB

No expense spared for these awesome graphics, seems retro eh?


While I have wired in the full C128DCR keyboard in the past using a circuit and software sketch with an Adafruit ItsyBitsy, now I trade the wire with another ESP32 and BLE communications.

M5Stick-C with CardKB BLE connected to T-Display-S3

Actually we already had BLE CardKB support, and the protocol for the hard wired keyboard is exactly the same as sent over BLE (string of active C64 and C128 scan codes), it was just a little bit of further coding to make the choice between CardKB and hardwired keyboard.   In fact, that code was already present for CardKB or hardwired keyboard in the M5 branch itself.  The tiny bit of extra work was to duplicate that in the BLE keyboard server project.   And voila!  More options all the way around.

Wired keyboards (a) Commodore (b) CardKB (c) Chrome Browser

There were already three options for wired keyboards.  And three common Commodore keyboards were represented, because they all have compatible pinouts, and because I do have both Vic-20 and C128DCR at home.

Dropping the wire from the wearable (or other ESP32 emulators) adds convenience to mobility, and also defers the need to support wired connections to any ESP32s missing Grove connectors and any that are not 5V tolerant, as both the ItsyBitsy and CardKB use 5V interfacing.   BLE support, and improved BLE support provide more options to the emulators running on hardware such as the T-Display-S3 and the 7"LCD ports without any hardware interventions.  While these latter ports would require extra circuitry for hardwired serial or I2C connections including 5V to 3V3 interfacing, using BLE means that the existing circuit support on the M5Stick-C acting as the BLE server can wire to those keyboards instead.  Going wireless provides the equivalent functionality without requiring a hard-wired circuit to the final display device.

While wireless does have its convenience, it does require careful timing to pair correctly.  Typically if both the BLE client and server are powered or reset at the same moment, they should pair.   A few or more keystrokes may be necessary to confirm pairing is complete.  If it doesn't work, just reset and try again.

Happy C64 computing over BLE!

Tuesday, December 5, 2023

7" LCD (ESP32) with C64 Text Emulator


7" is giant compared to this much smaller screen

So this ESP32-8048S070 showed up from AliExpress today.  It is a 7" IPS with touchscreen with ESP32-S3-WROOM-1 module, 16MB flash, 8MB PSRAM, microSD card, USB-C serial (CH3400 serial), Speaker connector, and other IO connectors.   The large LCD is 800x480 resolution.

The ordering page had a ZIP download of the examples, so I made sure I could build their Arduino Hello World TFT sample (I downgraded to Arduino_GFX library 1.3.1), and then ported my c-simple-emu6502-cbm project including upscaling from one to four pixels to cover the screen with C64 goodness.  Without upscaling, the C64 was using less than a quarter of the screen.   I skipped the SD support, and went straight to creating a FATFS partition and uploading a D64 image.  Saves me from pulling an SD, but moving files up and down will be a bit more cumbersome.  Included in the project already was custom wireless BLE keyboard support, so I was typing away and running my programs right away.

The largest IPS I had on hand was 3.5" 480x320, so this is a definite upgrade.  

The only downsides to this board that I can tell are the lack of an enclosure (ships in a nice plastic storage box though - I hear there is a 3D printable one on github somewhere though), and the lack of direct connection to the native ESP32-S3 USB port.  Then again, a permanent serial connection is more convenient for flashing Arduino sketches otherwise you have to keep selecting the COM port on other solutions.

Even though I've worked with it only a few hours, I highly recommend this board!

Monday, December 4, 2023

New! and Improved! C64 text emulator

There has been a steady stream of improvements to my wearable C64/C128 text emulators and related projects since the Summer 2023 debut at VCF West 2023 in Mountain View.  My Twitter/X account includes posts of many of these advancements.

  • used a 6502 test suite to find problems in my emulation
  • Vic-20 emulator
  • Vic-20 upscaled resolution
  • A few more hardware targets supported, including much smaller sizes
    • M5Fire 320x200
    • M5Atom S3 128x128
    • M5Stick-C 160x80
    • LilyGo T-Display-S3 320x170
  • Downscaling resolution as necessary
  • Tilt and pan for 1:1 resolution on tiny screen sizes
  • FATFS partition for files when no SD present, and when PSRAM not present
  • M5Stack CardKb support
  • wireless keyboard (BLE server/client)
And all these changes are stored on GitHub of course!

A fellow attendee at Vintage Computer Festival West 2023 sported a red M5Fire and it looked really good!  So I ordered one soon after, it arrived with some other goodies, and I quickly ported the M5Core2 and M5CoreS3 solution to the M5Fire.   Features are comparable.

Then I added keyboard support to the on-screen buttons.  Left goes up.   Right goes down.   Center is Return.  Left+Center is Shift+Run with a ROM change to make it load the first program from disk.  And Left+Right toggles between the different emulators (C64 -> C128 -> Vic-20)  This made an actual keyboard optional for demos.  I had a boot program to provide a listing of programs selectable by cursor keys and Return key.  

The only downside is that the M5Stack Fire is not watchband compatible in that the recharge circuit is in the detachable base, not in the unit itself.  Otherwise it would make a classy wearable.


Vic-20

The Vic-20 was my original home computer.  It is what I used to deep dive into Commodore, learning BASIC and 6502 Assembly Language inside and out from about 1982 to 1985.  I still have a fondness for this system.

But it has an odd screen resolution.  Text is 22 columns and 23 rows equating to 176x184 pixels.

The M5Core series controllers have an LCD 320x240.   This was just perfect to match the standard text screen of the C64 which is 320x200 pixels. 

Originally I simply increased the border sizes around 176x184 pixels.

Then I revisited my Teensy C64 which has an option for a 480x320 LCD screen.  For that project I researched upscaling, which involved scaling an 8x8 character cell to a 12x12 character cell, using color averaging.

For the M5Core series, I similarly scaled the Vic-20 8x8 character cell to 12x8.   To accomplish this, staring with pixel offset 1, an extra column is interpolated from the previous and next pixels, and repeated a total of four times.  The LCD works in 16-bit color mode with 5 bits for red, 6 bits for green, 5 bits for blue.  The color of the two pixels is broken down into its component red/green/blue parts, the corresponding color parts are averaged (totaled and divided by 2), then recombined into a 16-bit value for the interpolated pixel.

So far only the M5Cores with PSRAM have Vic-20 and C128 support.

M5Atom S3

This is the smallest target hardware I have ported to.  Downscaling was implemented to see what would happen.  The 8x8 character cell is downscaled to 3x4 pixels, so 64 pixels downscaled to 12 pixels which is a large number of pixels to through away.  Priority was given to the center pixels, so it toggles between averaging 6 (3x2) or 4 (2x2) at once.  It does a weighted average between the foreground color, and background color pixel counts, so the resulting downscaled pixel is closer to one or the other.

Surprisingly, the screen is somewhat readable even with this resolution loss.  But to compensate for loss a zoom and tilt to pan feature was implemented.  The whole screen is mounted as a single pushbutton.  Clicking it toggles between zoomed out to the downscaled resolution, and the zoomed in to the pixel perfect 320x200 resolution that is panned, by tilting the device.  Zoomed in, hold the device level with the floor, with the screen pointed to the ceiling, and you will see the top center of the C64 screen.  Tilt to the right and forward to see the top left corner of the emulated screen, and so forth to switch between one of six views of various parts of the emulated screen with every pixel shown.   Click again to zoom out for an overview of the entire screen, but downscaled.  Break out a magnifying loop or such to see the detail of the teeny tiny pixels.

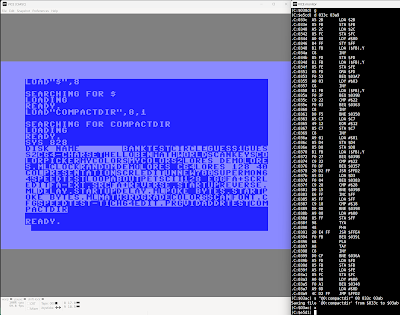
This platform does not include an external storage device such as SD card.  Nor does it have PSRAM normally used by the D64 emulation.   Instead, a FATFS partition was initialized, and individual C64 PRG files were selectively uploaded to the device.   The "$" directory functionality is not present, but LOAD/SAVE/VERIFY are supported.   There is room for about 1.5MB of files in the partition size selected, that's about 9 times larger than the standard single sided C64 floppy, so not too bad!

M5Stick-C

I had forgotten about this hardware device.  It was the first M5Stack device I had purchased, and I had squirreled it away in a project box.   Obviously it was too small for a C64 screen so I didn't give it another thought.   Until I saw a post on Twitter/X showing the solution with CardKB.  Looks like it's using my text-only emulation, using LCD fonts.  Of course I respond!  That would work very well.  I've just been so focused on LCD pixelized solutions simulating the look and feel of Commodore instead of remembering the roots of my text emulation efforts with C64.   Just hook CHARIN and CHAROUT and you're golden.  You don't need a screen editor.  You can just do buffered line input (local edit), and character output.   I was laughing at myself for not pursuing this myself.  CardKB provides ASCII output (from I2C polling) of the alphanumeric characters, and other byte ranges for functions and cursor keys. 

I wanted to do CardKB, but as I have been focused on C64 scan code adapters, it seemed hard.  But here was the challenge presented on the Internet.  I had already implemented an adapter of sorts leveraging a SeeedStudio ATMEGA328P (Uno compatible) board with Grove connectors and an Arduino sketch to translate I2C reads into TTL serial scan code reports.  And it worked, but was very clunky because of all the cords and extra board.   My existing prototype solution was not great for a wearable solution.

The M5Core and such were focused on using the Grove connector as a software serial port, receiving the C64 scan codes.  I had the original C128/C64/Vic-20 keyboard to Grove adapter running on an Adafruit ItsyBitsy and that was my favorite keyboard connection because it was true to the original!  Next best was a web page to USB Serial adapter I had also developed.   The common ground was scan codes, and serial communication.  But the CardKB runs I2C.   So how to do CardKB and serial communication simultaneously on the same Grove port?   Originally I thought of getting the source to CardKB and rewriting, reflashing it to do serial communication instead.  That would make it compatible with my existing solutions.  But I was avoiding the reflashing that would also requiring rigging a programming interface, using an Uno or compatible.   

Instead, I approached the Grove port as an either or, the emulators were updated to check for an I2C response at startup, and if found, regularly read from the I2C port for keyboard presses.  Then adapt those presses from ASCII/function code presses into momentary C64 scan codes, and 1/60th of a second later, respond with no key pressed (key up) scan code response.  This is an out of the box solution that will work for others too!

M5Stick-C also leverages a FATFS partition as there is no built in SD port.  Again 1.5 million bytes.,  Though I did have to revise the partition choices manually via a JSON file as FATFS was not included in the default partition schemes presented.

But the screen resolution is 160x80, with downscaling of one character's 8x8 pixels to 4x3 pixels.  This time the pixels are halved horizontally, and vertically there is an 8 to 3 pixel translation, very similar to 
the downscaling on the AtomS3, but rotated to different axes.

This is by far the worst unreadable display for individual text characters.  More than halving the vertical resolution makes the text completely unreadable (such as the startup screen).  It's not it's fault completely, and is a cute form factor when not pretending to be a C64.

LilyGo T-Display-S3

This is another inexpensive device with a wide yet shorter display 320x170.  Oh so close to the necessary 200 pixels.  So a custom downscaling algorithm favoring the center four vertical pixels of each character cell, while averaging the top two and bottom two pixels.  This results in a very recognizable display of alphanumeric characters with some slight distortion at the top and bottom of each character.

While this device has plenty of flash storage and PSRAM comparable to the best of M5Stack Cores, there is no built in SD card, so the implementation also leverages a FATFS partition successfully.  But with the PSRAM included, D64 support could be included allowing for the floppy drive image feature.

BLE keyboard support has also been included with this one, making it full featured.

The features missing are no Grove connector, no socket for CardKB support, and Vic-20/C128 support.  A bit more effort could transfer these features with software and hardware.

CardKB

     Esc 1! 2@ 3# 4$ 5% 6↑ 7& 8* 9( 0) <x
     Tab Q  W  E[ R] T/ Y£ U| Iπ O' P" fn
  Up  Shift A; S: D  F+ G- H← J= K? L  <-
Lt  Rt  Sym Z  X  C  V  B  N  M  ,< .> __
  Dn

fn+1..fn+0 is ctrl+1..ctrl+0
fn+A..fn+Z is commodore+A..commodore+Z
Esc is stop
fn+Esc is stop+restore
tab is load+run
fn+tab is restore
fn+<x is insert
fn+up is clear
fn+right is home
fn+down is toggle case (cbm+shift)

Wireless BLE Keyboard

Taking CardKB one step farther is joining it with a M5 controller such as M5Stick-C to turn it into a Bluetooth Low Energy keyboard.  Currently integrated with M5Fire, M5Core2, M5CoreS3, and T-Display-S3, turn them both on at about the same time and they will automatically pair.  While the keyboard is wired to the M5Stick-C, another ESP32 system can be battery powered and receive keystrokes over the air with the BLE (2.4GHz) radio.  


I used to wire the full size C128 keyboard to my wrist, and it was a hilarious irony in mobile computing.

Friday, June 30, 2023

Extremely small emulated C64 and C128


This "portable" Commodore 64 and 128 emulator (m5 source code branch) is my work in progress, one in a series of minimalist emulators ported to different hardware targets. Only text (on LCD) with background, foreground, border colors, keyboard entry via USB serial tethered web browser, and general 6502/6510 and C64 memory management emulation is present (no, won't play games, make sound, or do bitmapped graphics) with some D64 emulation [added 7/2/2023].

(Update 7/28/2023) Now with GO 128 command.

GO 128 command


Even my son asked, "Why do you need to do that?"  Well, he has a point.  I wanted a C64 that fit in my pocket or even on my wrist.  And targeting new hardware platforms with my emulator is part of my hobby.

How does it work?  Check out my highly technical drawing.

Now I already here you asking why I didn't connect Bluetooth to the M5Core, because certainly it has Bluetooth as well, and why didn't I use a USB keyboard connected to CoreS3, because it includes USB Host.  But I've had trouble tracking down examples of HID Host examples for M5; client examples are prevalent, but host?

Pictured here is a phone is running Chrome with a custom copy of the html/javascript keyboard adapter including web-serial-polyfill because mobile Chrome doesn't directly include Serial API support.  A Palm Pilot foldable keyboard has a Bluetooth adapter, paired with the phone.   HID keystrokes are captured by the web page, converted to C64 key scan codes, and a list of the active key scan codes (or 64 when keys released) is sent over USB Serial to the M5Core device which is running the C64 ROMs which are tricked into thinking a real keyboard is attached; keystrokes are processed by the C64 KERNAL IRQ as normal.

The M5Core is being powered by the phone.   Why M5Core?  Because it's a polished packaged solution.

Yeah, we could just run a Commodore 64 emulator on the phone, but this way, I could have complete control over the keyboard emulation, what keys are present, how CTRL and Commodore keys work, etc.  And it's just because I can, not because I should.

Why the Palm Keyboard?  Because it folds in my pocket!  And because I had one from back in the day.  Any keyboard you can attach to a phone or computer should work.  And this Bluetooth adapter just makes it so cool, and easier than a tethered keyboard.

The next step is to merge this solution with my Commodore 128 keyboard adapter to completely reject the portability feature.   That would look really cool hooked up to my phone!  Update (7/31/2023): check out YouTube for connection from ItsyBitsy/keyboard to Core Port.A.


C128 Keyboard Adapter Breadboarded Prototype


7/23/2023: PCB prototype keyboard adapter w/ ItsyBitsy

I am excited about my nonsense crazy adventures. Even if only I enjoy them.

=====

Update (7/2/2023): D64 support is currently working with Core2 only (Basic Core doesn't usually have the additional SPI RAM, but not yet sure why CoreS3 is failing to attach SD).

Update (7/3/2023): Got CoreS3 working with SD switching header to M5Unified.h for that target (was M5Cores3.h) and adding special definition, override logic for SD_CS to use GPIO_NUM_4 instead of default.  See updates to M5Core.h.

Update (7/28/2023): Commodore 128D extended keyboard working with UART connection to Port.A of Core, and Commodore 128 emulation is ported as well.

=====