Showing posts with label Commodore. Show all posts

Sunday, June 1, 2025

Programming Secrets for Creating Snake Game

How do you write a snake game?  Very carefully. ;-)

Open source at GitHub

For me, it started as an idea to make a featured game for my handheld Commodore emulator platform, most importantly the ones I can easily transport on my person.  I've written a simple but not complete Commodore emulator that behaves well on ESP32 and other available microcontrollers.  One example hardware platform is the M5Stack Fire that I can stick in my pocket and has physical buttons for inputs.

I was away on vacation with the family when I came up with the idea of replicating the snake game.  I was yearning for a good coding puzzle, and this was it!

So I started brainstorming on how one would accomplish it.  

First, I decided to just use BASIC.  It comes with the Commodores, and is relatively easy to work with.  I only have 40+ years experience so I should be able to get by.  So no machine language this time.

What system should I develop for?  Vic-20 is good for games as the text screen is small (22x23) and the characters are big, easy to see.

The key to snake is that each time it eats food it gets longer, so the snake is bigger and bigger as the game progresses, becoming an obstacle to your own movements.  As the snake moves, it inches along, the head advancing in one direction, and the tail catching up to where its next to last segment was.  So constantly the head and tail are both moving, and we have to keep track of where they are.  The answer is a circular buffer!  Segment locations will be stored in a circular buffer.  

What data structures do we have with BASIC?  Just arrays.  Can we implement a circular buffer with an array? Certainly, the array must be pre-allocated (DIM) with a fixed size, and keep track of the head and tail of the snake for the extents of the segments.  This is how you would do it in Pascal or C with an array, so BASIC is not much different.

How big should the array be?  Let's go big and say the snake can be as large as the screen.  But we want a title and score on the screen too, so let's say the bottom line is reserved for those.  That leaves 22x22 locations for the segments = 484.  Let's plan on keeping an offset into screen memory in each array element.

How should game inputs work?  Since my target platform has three buttons pre-configured for Up/Enter/Down, I want to use those, specifically Up/Down since I don't have access to four direction buttons.  I intend to use those buttons to rotate the direction left or right relative to the snake's current direction.

How shall we display the snake?  I bring up a PETSCII chart and look at the graphics characters.  I pick a circle outline as the head, a solid circle as body segments, and a graphic X as the death character.  Later in the process I chose the diamond as the food character.

So first step I implement the screen layout, place a single segment in the center of the screen, and implement moving around every second.  With some fine-tuning I get it working well, including implementing dying if hit the edge of the screen.  I am tracking horizontal position in X (0 to 21) and vertical position in Y (0 to 21) with DX and DY being -1, 0, or 1 each.  The D stands for difference or direction.  Moving is as easy as adding DX to X, and DY to Y, then making sure it is still within bounds, otherwise dead.

Quickly I found that allocating floating point values for the snake segments caused the original Vic-20 to run out of memory, so the array was changed to DIM S%(SZ) to use 2-byte integers instead of 5-byte floats.

The basics are in place, but the snake is not growing yet.  Next the circular buffer is implemented, and I implement computing the length of the snake for the score.  It took a few tries to get right, and once finished, I realized I could just track the score/length separately without all that fancy work, but it's done, so I let it be.

If the next position is another character or out of bounds, the snake dies.  If the next position is not food, the snake's tail is shortened so the snake appears to move.  But if the next position is food, then the snake appears to grow because the tail remains in place.  The head is drawn at the next position.

Between moves there is a delay of a fraction of seconds.  And as the snake gets longer, the delay gets smaller with a minimum delay to speed up the game, but keep it reasonable.

It took many incremental tries to get everything just right, took the opportunity of beta testing and feedback from my son, and addressed stuff including an opening information screen, the title/copyright/score bar, timing, and fixing bugs.  The bugs included running into your own tail that was about to move -- that is allowed, testable by spinning in a tight loop when 4 segments long.  

For inputs on a standard Vic-20, I remembered that cursor keys use shift to go the opposite direction.  That would be unnatural to require on a real Commodore, so I added Z and / (slash) as alternate inputs for rotating the head.  These keys are at opposite sides of the keyboard, so easy to indicate turn left or turn right.  (If someone doesn't like the key layout, it's in BASIC, easy enough to change.)

During the process of refinement I added random colors to the food, adjusted the randomizer to pick different colors than the head/tail of the snake so it appears to change, and the snake picks up the color of the food for an interesting effect.  Also the background color is avoided so the snake doesn't become invisible.

Next added Vic-20 joystick support.  Joystick support is implemented to direct the snake the literal direction of the joystick instead of rotating.  And avoids the direction opposite that the snake is already going so it impossible to reverse onto itself (otherwise the snake would die more often).  Also because of how the joystick and the keyboard share some input lines, it is necessary to disable some keyboard lines to read the joystick successfully.  Pressing STOP will break the program, but not reset the keyboard.  This renders some keys unusable until STOP+RESTORE resets the keyboard.  

Once the Vic-20 version was stable, source was pushed to GitHub.

Then the game was ported to Commodore 64 with 40 column screen.

And after that, Commodore Plus/4 and 16 port. initially with a machine language routine for reading the joystick until realizing that support is already in BASIC.

Next came a Commodore PET port designed to support most if not various models all running Commodore BASIC, including 40/80 column models, and actively switching to the uppercase/graphics character set in case a model defaults to lowercase.  Since the PET doesn't normally have a visible border, inverse spaces are placed around the edges to contain the snake a bit more.  Some screen real estate is lost but playability is gained.

I fell in love with the green on black look of the PET game, mostly for nostalgia, but to me it just looks perfect!  And that's when I adjusted the PET version to also run successfully on Vic-20 and C64.  It happens to work on C128 and Plus/4, 16 as well.  The PET version doesn't support joystick though, is all keyboard.  Detection of C64 turns colors to green on black, and Vic-20 does white on black.

Then I created Snake targeting my cbmish-script for the web...

And I'm still playing this game often daily...


Sunday, August 25, 2024

Wireless controller adapter for Commodore


It's August 2024.  I've just bought a new (to me) Vic-20 for US$50 to replace my childhood one.  I already have the PenUltimate Vic-20 Cartridge with a ton of games.  I also bought a Hyperkin Trooper joystick.  But I want to game wirelessly!

I've already had great success with a BlueRetro Nintendo GameCube controllers wireless adapter with my original Wii game console.  I purchased it on ebay for a good price and it worked great.

But I wanted to go back further to replacing an Atari joystick on my Commodore Vic-20 that has a DB-9 connector.  Searching the Internet, it looks like BlueRetro internally supports Atari 7800 with a 2-player mode, and there is a single player version available for sale on Amazon for about $25.  Also the ESP 32 firmware source code is available as open source.

Having experience developing with ESP32, and a plethora of electronic parts already at my disposal, I did what any enterprising consumer would do -- I purchased additional parts from AliExpress.  I mean, you can't have enough electronic parts, can you?  Okay, I could've done it completely from scratch but my time is valuable, I have only so much energy at the end of the day, and cheating my way to success is legal here.   So we're doing it halfway.

First I bought the BlueRetro Core.  It provides the base functionality with a DB-25 connector for all its pins.  It is designed to allow connector adapters to be wired to various console systems.  It is a very creative and functional design.  And there are adapters available for many of the common systems.  But I didn't have any luck finding Atari connectors.

But no problem!  I can build my own!  So I found a DIY screw terminal DB25 male connector with the correct optional mating screws, and the counterpart DB9 female connector with screw terminals.  The only trick left is to wire it up.

Steps

  1. Connect BlueRetro Core to USB power adapter (don't require direct connection to computer)
  2. Download latest firmware ZIP via link provided on BlueRetro support site
  3. Unzip, and look for the parallel 2P firmware (1P should work fine too, skip the 3V3 versions.
  4. Follow flashing firmware instructions from BlueRetro support site
  5. Pair a supported wireless controller (I'm using an Xbox One Bluetooth compatible controller)
  6. Plug BlueRetro Core into the DB25 breakout
  7. Connect a voltage meter to ground on the breakout, and then test the voltage at each remaining pin with and without pressing a button (e.g. DPAD up/down/left/right, and A)
  8. Write down the DB25 pin numbers and the names of the controller functions
  9. Unplug the core, and power off for now
  10. Search the internet for the DB9 pin numbers for Atari joystick connector pinout so you have their functions handy
  11. Cut and strip ends of 8 wires of different colors long enough to connect the DB9 and DB25 breakouts
  12. Be sure to first feed the wires through the included rings, and confirm their orientation.
  13. Then connect the appropriate functions: up, down, left, right, fire, framing ground, signal ground, and voltage in  (VIN) to +5V supply from Commodore/Atari
  14. Minimally connect, and test the functionality first with meter, then with Commodore/Atari console
  15. Once verified working, finish connecting wiring stress-relief, bolt the enclosures closed, and otherwise button-up and tidy up the solution.
  16. Play games!
DB25-1   to DB9-4   (right)
DB25-4   to DB9-3   (left)
DB25-GND to DB9-GND (frame ground)
DB25-7   to DB9-7   (VIN to +5V)
DB25-8   to DB9-8   (signal ground)
DB25-13  to DB9-6   (fire)
DB25-15  to DB9-1   (up)
DB25-17  to DB9-2   (down)

Another link to support this wiring is the BlueRetro Hardware Design documented over at hackaday.  There are schematics showing signal ground and VIN with the DB25 pinout.

I had fun with this effort, and should be able to expand this effort to support a second controller simultaneously connected to the same core, or wire up adapters for other systems myself.

The cost of the solution for me was about $22 with shipping, and as I was careful to choose items shipped directly from AliExpress and live on the west coast of USA, received the items quickly in about a week.  While this didn't save me the labor and only saved $3 from the Amazon solution, I learned a lot and feel comfortable leveraging the result to make solutions for other consoles and a second player.

(Any of you worried about 5V tolerance on the ESP32 or the buffer chip included with BlueRetro Core?  The Commodore is at 5V, and while the ESP32 is powered by 5V its IO is exclusively 3.3V.  It works for me without any additional consideration, but your mileage or concerns may vary.  You can usually get away with it for ESP32 as many of the IO are designed to survive 5V, and a 3.3V high signal does read as a high signal with most 5V systems.  So am I just getting away with it?  Maybe.)

But wait! Some keyboard lines are not working. I'm not done yet!

So with some prototyping, it turned out that the circuit to the Vic-20 needed to be open drain instead of push-pull. Pulling down was fine, but something was amiss with pushing 3.3V (or even 5V with other attempts) from the ESP32 BlueRetro Core circuit.

How does an Atari style joystick work anyways? There are 4 directions and one extra button. When any of them are active, the associated line is connected by a switch to ground. The BlueRetro Core simulates this by pulling to ground just fine, but when idle, it is pushing 3.3V. And the Vic-20 has its own 5V pull ups. That does sound messy. Somehow (without looking at the various schematics) this appears to cause a conflict so the 2, 4, etc. and F7 keys for example don't work anymore, they can't pull down to ground when this joystick circuit is attached.

So let's think how to correct this.  We want the connection to ground when the joystick is active, but we want high impedance (appear disconnected) when the no direction or selection is made.

The solution is a circuit that can perform this.  At first I'm thinking I don't have any FETs left over from previous projects, but finally after using one of my go-to buffer chips in breadboard circuits trying to solve this thing, I finally remembered that instead of being annoyed there are enable inputs for each buffer, the enable inputs can function as the inputs from the BlueRetro Core.   They are enable low, so when the joystick selection is made, the circuit will connect, and can take a grounded low input and buffer that to the Vic-20 joystick port.   So when the button or movement is made, the circuit will be grounded low, but otherwise that individual circuit is disabled (high impedance) as if the switch is not connected.  And this separates the 5V Vic-20 circuit from the 3.3V BlueRetro Core (ESP32) circuit.  And best of all, testing on breadboard, it works great!   The keyboard is now functioning normally with the joystick circuit powered and connected, and is still self powered from the Vic-20.

The revision to the above wiring is to connect DB25 joystick lines to OE/ lines of a SN74AHC125N, connect ground to the A lines, and connect the Y lines to the appropriate DB9 joystick lines. Also connect 5V power (14) and ground (7) to the appropriate IC pins.  And since there are five joystick lines, and this is only a quad (4) buffer part, we're gonna need two of them (and three if extending to two joysticks for dual player such as with a C64 or Atari 2600 VCS).  I recommend setting the unused enable lines for the extra buffers high (5V) to disable their outputs.

Again, these buffers are only for up/down/left/right/fire(select).   The voltage and ground wires should be wired between the DB25 and DB9 without buffering.


Sunday, August 11, 2024

Vic-20 memory configurations supported by emulator


The C128 team invented the GO64 command for compatibility.  Years ago I claimed to invent the GO128 command, and GO20 and some others.

My Commodore emulator (unified branch) that supports Windows and LCD targets including compact watch form factor, now supports an argument to the GO statement to specify the total memory to configure.

The Vic-20's memory map looks roughly like this.

//   (from emuvic20.cpp)
//   $0000-$03FF Low 1K RAM
//   $0400-$0FFF (3K RAM expansion)
//   $1000-$1DFF 3.5K RAM (for BASIC) [or alternate screen address]
//   $1E00-$1FFF 0.5K RAM (Screen characters)
//   $2000-$7FFF (24K RAM expansion)
//   $8000-$8FFF (Character ROM)
//   $9000-$9FFF (I/O)
//   $A000-$BFFF (8K Cartridge ROM, or RAM expansion)
//   $C000-$DFFF BASIC ROM
//   $E000-$FFFF KERNAL ROM

The Vic-20 was manufactured with 5K RAM, with only 3.5K available for BASIC, not counting the color RAM nybbles (half-bytes).

There is a missing hole of 3K RAM in lower memory, cartridge sold separately.   And you could also purchase 8K or 16K RAM cartridges.  And later on 24K and 32K solutions.   Up to a total of 35K RAM can be added into the memory map.

So specify the amount of RAM you want to add, and rounding down, the emulator will populate the appropriate memory.

But only 27.5K is available to BASIC programs.  1.5K is reserved for system use, the lower 3K RAM is only available to BASIC in some instances, and an upper 8K is reserved for cartridges and otherwise not contiguous, so also not available directly for BASIC use.

The VIC video chip (named VIC) can only address screen memory on the main board, so when both 3K and 8K memory expansions are populated, screen memory is directly in the middle, causing Commodore BASIC to ignore the lower 3K memory to prioritize for the larger contiguous memory configured after screen memory.  The 3K lower memory is only used directly when it is the only contiguous RAM expansion, such as with the separate 3K memory expansion cartridge and with the Super Expander that included 3K RAM expansion, but stole more memory for the programmable function keys, and for the graphics screen.

GO 20        (default, 3583 bytes free)
GO 20, 5    (minimum, 3583 bytes free)
GO 20, 8    (5K, +3K, 6655 bytes free)
GO 20, 13
    (5K, +8K, 11775 bytes free)
GO 20, 16    (5K, +3K, +8K, 11775 bytes free)
GO 20, 21    (5K, +8K, +8K, 19967 bytes free)
GO 20, 24    (5K, +3K, +8K, +8K, 19967 bytes free)
GO 20, 29    (5K, +8K, +8K, +8K, 28159 bytes free)
GO 20, 32    (5K, +3K, +8K, +8K, +8K, 28159 bytes free)
GO 20, 37    (5K, +8K, +8K, +8K, +8K, 28159 bytes free)
GO 20, 40    (5K, +3K, +8K, +8K, +8K, +8K, 28159 bytes free)

Note that many of these show the same number of bytes free even though extra memory has been added. This again is because only contiguous RAM can be configured as available to BASIC.  The extra RAM is available for PEEKs, POKEs, and other machine language programs.

If a number out of range is entered, it is effectively rounded down to a valid configuration.  For example GO 20, 64 will configure with 40K RAM.   But 5 is the minimum, so GO 20,0 will configure 5K RAM.

Technically the Vic-20 tests for and can handle memory added in smaller configurations, but that's not commonly present in reality, and not how I implemented it.   Also I only implemented adding 8K memory forward in the map (with the exception of the 3K coming and going based on math), and not configuring each section separately.  Going with a total RAM value is a simpler concept to implement and understand.

Please enjoy the Vic-20 with extra RAM!


Tuesday, July 9, 2024

Disassembler for use with WozMon


Disassembler disassembling WozMon

WozMon is a great little monitor program in 256 bytes which Steve Wozniak wrote for his Apple 1 release in 1976.  It was small but powerful allowing for memory inspection, entry of 6502 machine code programs and bytes, and launching of programs in ROM and RAM (jumping to address).

But being small, it is missing features that monitor users have learned to depend on, including a mini-assembler and disassembler.

So here I am today presenting a disassembler I wrote for 6502 which can be integrated with WozMon run command.  Once the disassembler gets control, the Y register contains a pointer to the last character read from the input buffer, and continues parsing for a hex address.  If not found, it simply returns to WozMon.  But if found, it will disassemble 20 statements starting at that address.  (Note: Vic-20 port above, changed to 17 statements due to the smaller screen size).

The syntax may be lengthier than other monitors, but it allows for an integration with the normally ROM based WozMon without modifications.  Plus you get what you pay for.   The disassembler is open source, so feel free to change it.

The disassembler came into being as part of developing a mini-assembler.  First I'd written a prototype in C# .NET. 

The assembler included tables of information for the 6502 instruction set and addressing modes that lent itself to be used as a disassembler (came second) which was prototyped as a 6502 program that disassembles itself.  Third came the disassembler compatible for use with WozMon.

Each prototype and program is one step along the way for the goal of creating a mini-assembler for my 6502 minimal system.  Not there yet, but getting closer with each step!

Also works with original WozMon in Apple 1 style environment

Also works on C64 and C128 systems


Wednesday, June 12, 2024

Strings or Compact directory utility for C64


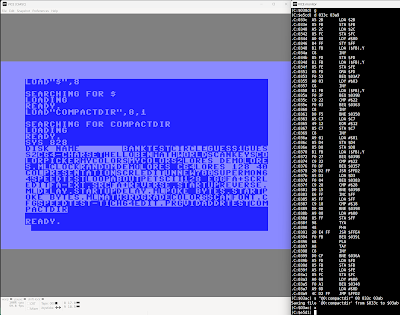
Directory listings scrolling by too fast?  Want to scan program for string literals?  Here's a stupid (sometimes useful, definitely ugly) utility I created in the monitor for both scenarios.  Compact display and pauses every 24 lines.  Attempts to avoid control characters.

Note: operates on whatever loaded program is in memory, assuming BASIC. 

Shown loading into tape buffer (828), can be relocated. 

This source is an example of parsing a BASIC program.  The beginning of BASIC is grabbed from $2B/2C, and each line of the program is iterated through traveling its linked list ending with a null pointer.  In each line, a string starts with double quotes and ends with double quotes or end of line (zero or nul character).  Multiple strings per lines are possible.   Other memory addresses used include toggling the reverse flag ($C7), setting quote ($D4) and insert ($D8) modes, and counting each time at the left column ($D3).  Outputs string characters via $FFD2, and waits for a key press via $FFE4.

This is a short program that can be studied.  I hope you find it useful and informative.  Enjoy!

Links:
  original (compact) strings.prg
  updated (one line) strings.prg
  source at github

Copyright (c) 2024 by David R. Van Wagner
MIT LICENSE

UPDATE: (September 3, 2024) compact version was too ugly for me.  Have since updated source to display one string per row of the screen, with an option (POKE 951, 96) to revert to compact functionality.   See updated links above.

Sunday, June 2, 2024

BANKTEST for C64

While adding banking support to my own C64 emulator back in the good 'ole days (April 14, 2020, maybe only good for hunkering down on retro stuff), I also wrote a test program to help verify the results.  This may help you visualize how you can access more RAM and ROM on the C64.

The program works by switching to the RAM only bank writing a signature high byte to four addresses, then cycles through the standard list of banks reading the value at those locations.  Of course the first line for bank zero shows the bytes as expected.  But the other banks tell a different story.

A000-BFFF is BASIC ROM.   Appears ROM is active in banks 3 & 7 only, otherwise is RAM.

C000-CFFF is always RAM.

D000-DFFF is usually I/O (banks 5-7) including color RAM at D8000 (notice the high nibble changes in this run).  May also appear as RAM (banks 0 & 4), CHAR ROM (banks 1-3).

E000-FFFF is BASIC ROM (banks 2, 3, 6, 7), otherwise RAM (banks 0, 1, 4, 5).

It is interesting to see the similarities and differences in this chart.

The key code to switching banks includes

        sei

        lda $01

        and #$f8

        ora #bank_selection

        sta $01

        rts

Only clear the interrupt flag (cli instruction) once you have returned to the normal bank (7) so IRQ vectors and the KERNAL/BASIC ROMs will work as expected.

I have also color encoded the banks in this chart to represent their effects:

Links

Sunday, May 26, 2024

LCD version of 6502 emulators ported to Windows


LCDs and Windows too!

Now the c-simple-emu6502-cbm unified branch that works with LCD systems has been ported to Windows!  This is an emulator that includes a feature to switch between various popular Commodore 8-bit models from the BASIC prompt.

You may ask yourself, hey self, wasn't Windows already a supported system?  And you could answer, yes self, it was.  But only in text mode.  If you wanted to run Commodore BASIC from a command prompt, yes you could do that.  If you wanted to run this emulator with the nifty "GO 128" command in a graphical environment you were required to use those smallish LCDs (well the 7" isn't too smallish).

Now, by porting this C++ project back to Windows again, using GUI elements, it can now look more like a Commodore.  The fully resizable window, and keyboard support make it feel like you have a Commodore right in front of you.  You virtually do!

For now, you need to compile the project in Visual Studio 2022 (Community Edition should work just fine).  It probably also works from Visual Code, but I haven't attempted that yet.

Dependencies include a roms folder (see README.md), optional disks/drive8.d64, and optional disks/drive9.d64

The purpose of this is to ease development of new features, utilizing the feature rich Visual Studio IDE including debug support.

The benefits to other users include being able to test drive the project in an environment they already have - their existing Windows desktop or VM.   And if you love it and think you may enjoy a portable version, you can then invest your dollars into an LCD solution via various online retail websites.   There may even be a search engine out there to help you too.

Are you keeping up with Commodore?  Happy computing!  Spend that money wisely.

Tuesday, April 30, 2024

Raster Interrupts for C64


The VIC II chip (video IC) that gives the C64 a lot of its characters (pun intended), includes registers to set up interrupts at certain raster lines.  This allows for video tricks.  Above the background color is changed in the middle of the screen, and changed back when in the borders before drawing the screen again.


This code was leveraged from my character editor source for c64.  That project needed to display multiple different character sets (from ROM and RAM) on the screen simultaneously.   And that is described at the bottom of an earlier blog post.

My approach was to launch Vice x64sc (Commodore 64 emulator) and utilize its built in monitor (ALT-H) to craft prototype code.  The listings following are what I came up with.   Then I used the clipboard to move to a source editor, added labels, and further refined to change from background colors to font changes.

Written by Dave VW 2024-04-27

*** NOTE THIS IS THE ROUGH DRAFT
*** SOURCE CODE AT GITHUB IS MUCH CLEANER
*** ASSEMBLY SOURCE INSTEAD OF MONITOR LISTING

This part was created in the monitor...

>C:c000  2c 19 d0 10  44 ea ad 19  d0 29 01 f0  3b 2c 00 c1
>C:c010  30 16 10 60  ea a9 00 8d  12 d0 ad 11  d0 29 7f 8d
>C:c020  11 d0 0e 00  c1 4c 3b c0  ce 21 d0 a9  a4 8d 12 d0
>C:c030  ad 11 d0 29  7f 8d 11 d0  4e 00 c1 a9  01 8d 19 d0
>C:c040  ea 68 a8 68  aa 68 40 00  ea 4c 31 ea  a9 40 8d 00
>C:c050  c1 78 a9 80  8d 12 d0 ad  11 d0 29 7f  8d 11 d0 a9
>C:c060  00 8d 14 03  a9 c0 8d 15  03 ad 1a d0  09 01 8d 1a
>C:c070  d0 58 60 00  ad 12 d0 c9  c2 90 f9 a2  0a ca d0 fd
>C:c080  ee 21 d0 4c  15 c0                                

.C:c000  2C 19 D0    BIT $D019
.C:c003  10 44       BPL $C049
.C:c005  EA          NOP
.C:c006  AD 19 D0    LDA $D019
.C:c009  29 01       AND #$01
.C:c00b  F0 3B       BEQ $C048
.C:c00d  2C 00 C1    BIT $C100
.C:c010  30 16       BMI $C028
.C:c012  10 60       BPL $C074
.C:c014  EA          NOP
.C:c015  A9 00       LDA #$00
.C:c017  8D 12 D0    STA $D012
.C:c01a  AD 11 D0    LDA $D011
.C:c01d  29 7F       AND #$7F
.C:c01f  8D 11 D0    STA $D011
.C:c022  0E 00 C1    ASL $C100
.C:c025  4C 3B C0    JMP $C03B
.C:c028  CE 21 D0    DEC $D021
.C:c02b  A9 A4       LDA #$A4
.C:c02d  8D 12 D0    STA $D012
.C:c030  AD 11 D0    LDA $D011
.C:c033  29 7F       AND #$7F
.C:c035  8D 11 D0    STA $D011
.C:c038  4E 00 C1    LSR $C100
.C:c03b  A9 01       LDA #$01
.C:c03d  8D 19 D0    STA $D019
.C:c040  EA          NOP
.C:c041  68          PLA
.C:c042  A8          TAY
.C:c043  68          PLA
.C:c044  AA          TAX
.C:c045  68          PLA
.C:c046  40          RTI
.C:c047  00          BRK
.C:c048  EA          NOP
.C:c049  4C 31 EA    JMP $EA31
.C:c04c  A9 40       LDA #$40
.C:c04e  8D 00 C1    STA $C100
.C:c051  78          SEI
.C:c052  A9 80       LDA #$80
.C:c054  8D 12 D0    STA $D012
.C:c057  AD 11 D0    LDA $D011
.C:c05a  29 7F       AND #$7F
.C:c05c  8D 11 D0    STA $D011
.C:c05f  A9 00       LDA #$00
.C:c061  8D 14 03    STA $0314
.C:c064  A9 C0       LDA #$C0
.C:c066  8D 15 03    STA $0315
.C:c069  AD 1A D0    LDA $D01A
.C:c06c  09 01       ORA #$01
.C:c06e  8D 1A D0    STA $D01A
.C:c071  58          CLI
.C:c072  60          RTS
.C:c073  00          BRK
.C:c074  AD 12 D0    LDA $D012
.C:c077  C9 C2       CMP #$C2
.C:c079  90 F9       BCC $C074
.C:c07b  A2 0A       LDX #$0A
.C:c07d  CA          DEX
.C:c07e  D0 FD       BNE $C07D
.C:c080  EE 21 D0    INC $D021
.C:c083  4C 15 C0    JMP $C015

The initialization routine is at $c04c to install the new IRQ handler $c000.  The code jumps around a bit and has NOP (no instruction) as a by-product of patching the source in the monitor to get the desired functionality.   This is cleaned up a lot more in the sources to both repos.

Friday, April 19, 2024

Edit Programmable Characters on Vic-20 and C64


The current release is considered fully functional and complete.

Links:

Vic-20 D64 (1541 image) and source

Commodore 64 D64 (1541 image) and source

The Commodore Vic-20 video chip added multiple features beyond what the original PET Model 2001 offered.  Besides color support, it also includes the ability to change to user defined character sets.  These can be used to customize the look and feel of a program, and also to provide bitmapped graphics.

Back in the 80s I was proud of my development of a character editor program that utilized a few machine language routines to perform quick operations via keyboard selections.   Unfortunately I don't have direct access to that program today (haven't been able to read the tape back into the computer yet).  So I decided to rewrite it again.

This time it is purely 6502 assembly code.  I started using the VICE monitor to write the initial functionality, and soon afterwards transitioned to ACME source to ease edits and additions.

After mocking up the look of the screen, identifying operations that would be nice to have, and testing out memory layout and configuring the video chip to use character images from RAM, I got to work.


1. Initial screen layout including editor and commands.

2. Navigation of character selection, displaying bit patterns for editing to screen, and displaying hex character value and byte values.

3. Editing the pixels in a single character.

4. Saving font to floppy disk.

5. Continuing to iterate with new features and enhancements


Description of key operations

pressing a key on the keyboard as shown below will perform an operation:


@ - toggle between RAM/ROM character sets

SPACE - toggle pixel on/off

B - navigate back one character

C - copy

F - flip upside down

M - mirror the image left to right, right to left

N - navigate forward to next character

R - rotate 90 degress to the right

S - save to FONT.BIN (WARNING: overwrites any previous saves)

V - paste

X - cut

Y - redo

Z - undo

- minus - navigate 16 characters back

+ plus - navigate 16 characters forward

< > - shift pixels left/right

↑ - shift pixels up (^ carrat on PC)

Shift V - shift pixels down

CLR - erase all pixels

CURSOR keys - move cursor left/right/up/down

HOME - move cursor to upper left position

RVS - inverse the pixels

STOP - exit (usually mapped to ESC on PC)


There are up to 24 levels of undo [Z] (25 levels of redo [Y]) when editing a character.  Navigating will clear the undos/redos.   And there is a virtual clipboard which you can copy[C]/cut[X]/paste[V] a single character.   Note in this program you do not use the Ctrl key for clipboard as you do on a PC.

Notes:

  • When launching the program for the first time, the ROM font will be copied to RAM, including moving the start of programs up to $1800 past the RAM characters.   Subsequent runs from that address will not recopy from ROM.  If you want to restart fresh from ROM, either reset your computer and run again, or POKE 44,16:SYS 6157.  You don't have to memorize the entry point, you can also LIST the line of BASIC that calls into the entry point.
  • Saving overwrites FONT.BIN.  So if you want to save your work permanently, it is recommended to rename your file to something else.
    OPEN 15,8,15,"R0:COOL=FONT.BIN":CLOSE 15
  • To LOAD your font for editing, be sure to run the program at least once, then load before running to enter back into edit mode.  Be sure to include the ,1 otherwise you will wipe the font editor out of memory, then best to restart your Commodore and try again.
    LOAD "COOL",8,1
  • Pressing COMMODORE+SHIFT while in programmable characters will shift to a second set of characters which we don't have room for in RAM, so you will see bitmapped images of the program and video memory.   Press the key combination again to return to the first set of characters. [Disabled in the C64 port]

Update 2024 April 20: also ported to Commodore 64

Update 2024 April 26: more documentation

Description of key operations since added to Commodore 64 version

H - hide UI except pixels and character for a minimalist experience

/ - swap between two RAM character sets (C64 version edits total of 512 characters) 

F1 - foreground color

F2 - cursor color 

F3 - background color

F4 - character set 1 color

F5 - border color

F6 - character set 2 color

F7 - large pixel set color (editor)

F8 - large pixel cleared color (editor)

, - change titles color

. - change menus color

1,2,3,4,5,6,7,8,9,0 - select theme (colors and grid mode)

 As the C64 has a different memory layout, video memory is at a lower address $0400 and more memory available, the memory map is a bit different.  The start of the program is still at $1800, but the programmable characters are now from $0800 to $17FF, a full 4K (512 characters). 

Note that only the first character set (256 characters) is visible at this address without moving the character set to another location (planned for future).  But the editor can handle this by swapping the character sets in RAM for editing, swapping them back and forth, so one set is always edited from the lower $0800-$0FFF range that is visible.  Just be sure to swap back to the first set before saving, otherwise the character sets will be out of order.

To use both character sets in your own programs, it is necessary to manually relocate them or load them at another address, unless you use the swapping technique used by the editor.

It is not presently possible to use raster interrupts to show both sets because the second set is at an address that is mapped to ROM characters instead.  Another reason it is planned to move these in the future, for example to $3000-$3FFF but in the middle of BASIC RAM it may be too challenging to be useful to others.

Probably a better solution is to move both VIC-II memory to another bank of 16K, which also requires moving video memory.   Say bank 4 with characters at $F000-$FFFF, and video ram at $CC00-$CFFF.  Then move the start of BASIC to $0400, resulting in 39933 (39K) bytes available for BASIC, an increase of 1K the size of the video screen memory.

Leaving the editor, you have lost 4K of RAM from BASIC.  To reclaim 2K for the not visible second character set, POKE 44, 20: POKE 20*256, 0: NEW but don't load any of your double character sets or you will wipe out the first 2K of your BASIC program.   Best to leave 4K lost at start of BASIC in that case, or resize your character sets to a single set.

We're in the weeds here.   Back to the fun -- please enjoy the programmable character sets and the graphical opportunities they provide!

Update 2024 April 27: raster interrupts implemented as described above, with two sets on screen, and working area using ROM font so doesn't change.  Second set is copied to $3800-$3FFF for display purposes, while the two sets remain at $0800-$17FF.

Update 2024 April 28: themes implemented (10) and grid mode added, new C64 keys updated above.  Themes allow quickly changing between color sets and grid options using the numeric keys.

Update 2024 May 1: wrote an article on moving video and programmable character memory.

Update 2024 May 4: have fixed many issues, and more enhancements, including moving programmable characters to $2000-$2FFF to make more usable, eliminate need to have separate edit/view copies.  But loses more BASIC RAM ($0800-$1FFF 6K now available for other uses) while reserving memory for characters.

Primary Color Theme


Wednesday, February 7, 2024

Calculator for Commodore 64 and other CBM BASIC models


Introduction

Wow! A new desktop calculator for Commodore.  Programmed all by myself in BASIC.  Wow, so impressed!   Or not.  Doesn't even have decimals.

No, it's not the best thing since sliced bread, but it was fun.  And it's just a start -- there's a bigger goal I'll get to in a while...

This was a puzzle programming exercise I challenged myself with.  How to make the calculator, especially with the operator precedence feature.

Link: LOAD"CALC64",8

Implementation

Let's go through how it was implemented.

User Interface

First was the design of the user interface, by creating PRINT statements.  Used reverse text to make a rectangular box with the keys displayed.

How to click on a key?  I'm so used to a mouse or touch interface.  Oops, Commodore doesn't have that usually, or not so easy.  Ignoring the 1351 mouse for now.   Most Commodore users are used to using the keyboard or joystick.  Forget the joystick, this is not a game!  Keyboard entry one key at a time will do just fine.  Note that ENTER also acts as =, and DEL is equivalent to ←, and X is a synonym for *.

Entry of digits was the first processing, accepting up to the limit of the display.  This stored as a string (V$) with keyed entries appended.

I started with 7 digits, but outgrew that in testing and increased to 9 digits.

At first, only positive numbers were supported, then fixed it to support negative numbers, with the negative sign taking up a position in the display.   The N key toggles a number entry between positive and negative and back again.

Entries allowed by this calculator are interleaved numbers and binary (two argument) operators.  Note that immediate operators like C and N usually take effect immediately, whereas binary operators require multiple arguments and a finalization (another binary operator or =).

There are exceptions allowed in entries to overwrite the prior value or the prior operator.   Examples:

  • 1+1=3 keyed entries will replace the 2 with a 3
  • 2+x3 will replace the addition operator with multiplication operator

Precedence needs a Stack

One design requirement I set for myself was to include operator precedence.  This means that multiplication and division have the same higher precedence over addition and subtraction at the same lower precedence.  Usually math is evaluated left to right, but due to precedence issues, other operators may need to be done first.  In other words the expression 1+2x3 is equivalent to 1 + (2x3) and then 1 + 6 and finally evaluates to 7.   But 1 x 2 + 3 is equivalent to (1x2) + 3, then 2 + 3, and finally 5.

I simply put numbers and operators interchangeably on a stack in order of entry until enough information is present to start evaluating.

Rule 1 - if user presses =, then evaluate

Rule 2 - if first operator is multiplication or division, once the second number is finalized with a second operator, simply evaluate the first expression

Rule 3 - if first operator is addition or subtraction, defer until the second operator and third number is finalized (third operator present!), then figure out what to do - either evaluate first or second expression, reducing the work

The stack is implemented as a count C, and an array of strings S$, which is expected to only grow up to 6 items (0..5), example C=6, S$[0]="1" [1]="+" [2]="2" [3]="*" [4]="3" [5]="+"

This example 1+2*3+ is reduced to 1+6+ and then to 7+, with the display updated to show the 7, but then wiped to disallow appending to it.


And no, I'm not doing RPN.  I didn't grow up with an HP calculator, nor am I implementing one today.  I grew up with Texas Instruments, and that's how my brain works.   Keeping it in entry order keeps it orderly for me.  Sure, there are other was to approach it.   This is BASIC, not Lisp.  And this is MY calculator, so I'm doing it MY way.  Others can follow their own paths.

Expression evaluation includes handling the equals = operation.  In the context of this calculator, that finalizes a calculation, meaning the user wants the result now.

Subroutines

There are several subroutines: 1) Evaluate and reduce stack, 2) Update display, 3) Display stack, 4) Evaluate simple expression involving two numbers and an operator.

That last subroutine is a diagnostic useful most for development, but also shows work in progress compared to a regular simple desk calculator that usually won't show pending work.

Error conditions

Overflow is when the number to be displayed doesn't fit in the 9 digit display, when the string representation of the number is long than 9 characters and/or larger than the maximum whole integer value that can be displayed in that space.   Note that the number is still internally represented and can still be acted on.  If a resulting answer can be displayed it will be (example: divide a ten digit positive number by 10).

Error indicates that division by zero was attempted.

Limitations

Only integers are supported.  No decimal numbers.  No currency.   Workaround required to calculate a percentage -- multiply by one hundred first, then divide by whole percentage.  And division results in a whole number so 1/3= results 0, and 5/2= evaluates to 2.

Non-negative numbers are limited 0 to 999999999 (nine digits).  Negative numbers are limited -1 to -99999999 (note only 8 digits).

Scientific notation is not supported.

No paper tape, no printout, no record of operations.

Limited user feedback.  No keypress indicators.

Stack diagnostic is a little technical, especially with a count, then colon, and the entries.  (Could eliminate the count and colon, and/or show previous and pending operators before and after the display.)

Keyboard entry.

Extras

The program was saved with a starting address $400, to support PET, so you must not load with secondary address 1 on a C64!  And while the program assumes a screen bigger than a VIC-20, a few minor changes to the margin and startup text can remedy that.

Next

What does the future hold?  Who can predict with any accuracy?  I can say anything here, but doesn't mean I'll follow through.  I originally was contemplating near limitless number of digits (considering the 8-bit platform, probably some 16-bit limitation).   Maybe binary and hex?   Maybe a scientific calculator?   Fixed decimal?   Near limitless decimals?   Port to assembly for fun!   We'll see...

Have fun calculating!

Saturday, December 30, 2023

Commodore 128 VDC Reference


The VDC8563 and VDC8568 were used in Commodore 128 and Commodore 128D computers for the secondary 80-column text screen.  There were other modes available to developers not exposed to BASIC end users (graphics, interlaced modes for higher resolutions including graphics and text, and lower resolution modes too).

I gathered this information from multiple sources including example data from VICE (sorry, didn't power on the DCR) while implementing support for my own emulator.

Hope you find this useful!

Link: PDF

Saturday, December 9, 2023

Commodore keyboards go wireless for my portable emulators

The c-simple-emu6502-cbm project supports a number of ESP32 platforms to provide a subset of Commodore C64 (and Vic-20, C128) emulation, and many currently include BLE keyboard support.  Originally for CardKB only, now I have added BLE support for Commodore keyboards (20 to 25 pins) to the m5, T-Display-S3, and ESP32-8048S070-7inch ports/branches into the encapsulated BLE_commodore_keyboard_server Arduino sketch.

BLE options: (a) Commodore keyboard (b) CardKB

No expense spared for these awesome graphics, seems retro eh?


While I have wired in the full C128DCR keyboard in the past using a circuit and software sketch with an Adafruit ItsyBitsy, now I trade the wire with another ESP32 and BLE communications.

M5Stick-C with CardKB BLE connected to T-Display-S3

Actually we already had BLE CardKB support, and the protocol for the hard wired keyboard is exactly the same as sent over BLE (string of active C64 and C128 scan codes), it was just a little bit of further coding to make the choice between CardKB and hardwired keyboard.   In fact, that code was already present for CardKB or hardwired keyboard in the M5 branch itself.  The tiny bit of extra work was to duplicate that in the BLE keyboard server project.   And voila!  More options all the way around.

Wired keyboards (a) Commodore (b) CardKB (c) Chrome Browser

There were already three options for wired keyboards.  And three common Commodore keyboards were represented, because they all have compatible pinouts, and because I do have both Vic-20 and C128DCR at home.

Dropping the wire from the wearable (or other ESP32 emulators) adds convenience to mobility, and also defers the need to support wired connections to any ESP32s missing Grove connectors and any that are not 5V tolerant, as both the ItsyBitsy and CardKB use 5V interfacing.   BLE support, and improved BLE support provide more options to the emulators running on hardware such as the T-Display-S3 and the 7"LCD ports without any hardware interventions.  While these latter ports would require extra circuitry for hardwired serial or I2C connections including 5V to 3V3 interfacing, using BLE means that the existing circuit support on the M5Stick-C acting as the BLE server can wire to those keyboards instead.  Going wireless provides the equivalent functionality without requiring a hard-wired circuit to the final display device.

While wireless does have its convenience, it does require careful timing to pair correctly.  Typically if both the BLE client and server are powered or reset at the same moment, they should pair.   A few or more keystrokes may be necessary to confirm pairing is complete.  If it doesn't work, just reset and try again.

Happy C64 computing over BLE!

Friday, June 30, 2023

Extremely small emulated C64 and C128


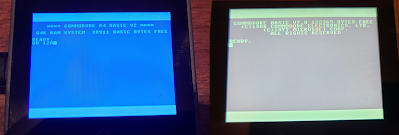
This "portable" Commodore 64 and 128 emulator (m5 source code branch) is my work in progress, one in a series of minimalist emulators ported to different hardware targets. Only text (on LCD) with background, foreground, border colors, keyboard entry via USB serial tethered web browser, and general 6502/6510 and C64 memory management emulation is present (no, won't play games, make sound, or do bitmapped graphics) with some D64 emulation [added 7/2/2023].

(Update 7/28/2023) Now with GO 128 command.

GO 128 command


Even my son asked, "Why do you need to do that?"  Well, he has a point.  I wanted a C64 that fit in my pocket or even on my wrist.  And targeting new hardware platforms with my emulator is part of my hobby.

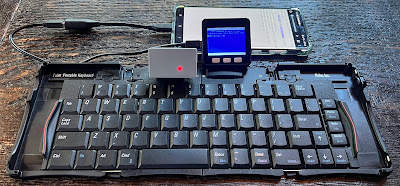
How does it work?  Check out my highly technical drawing.

Now I already here you asking why I didn't connect Bluetooth to the M5Core, because certainly it has Bluetooth as well, and why didn't I use a USB keyboard connected to CoreS3, because it includes USB Host.  But I've had trouble tracking down examples of HID Host examples for M5; client examples are prevalent, but host?

Pictured here is a phone is running Chrome with a custom copy of the html/javascript keyboard adapter including web-serial-polyfill because mobile Chrome doesn't directly include Serial API support.  A Palm Pilot foldable keyboard has a Bluetooth adapter, paired with the phone.   HID keystrokes are captured by the web page, converted to C64 key scan codes, and a list of the active key scan codes (or 64 when keys released) is sent over USB Serial to the M5Core device which is running the C64 ROMs which are tricked into thinking a real keyboard is attached; keystrokes are processed by the C64 KERNAL IRQ as normal.

The M5Core is being powered by the phone.   Why M5Core?  Because it's a polished packaged solution.

Yeah, we could just run a Commodore 64 emulator on the phone, but this way, I could have complete control over the keyboard emulation, what keys are present, how CTRL and Commodore keys work, etc.  And it's just because I can, not because I should.

Why the Palm Keyboard?  Because it folds in my pocket!  And because I had one from back in the day.  Any keyboard you can attach to a phone or computer should work.  And this Bluetooth adapter just makes it so cool, and easier than a tethered keyboard.

The next step is to merge this solution with my Commodore 128 keyboard adapter to completely reject the portability feature.   That would look really cool hooked up to my phone!  Update (7/31/2023): check out YouTube for connection from ItsyBitsy/keyboard to Core Port.A.


C128 Keyboard Adapter Breadboarded Prototype


7/23/2023: PCB prototype keyboard adapter w/ ItsyBitsy

I am excited about my nonsense crazy adventures. Even if only I enjoy them.

=====

Update (7/2/2023): D64 support is currently working with Core2 only (Basic Core doesn't usually have the additional SPI RAM, but not yet sure why CoreS3 is failing to attach SD).

Update (7/3/2023): Got CoreS3 working with SD switching header to M5Unified.h for that target (was M5Cores3.h) and adding special definition, override logic for SD_CS to use GPIO_NUM_4 instead of default.  See updates to M5Core.h.

Update (7/28/2023): Commodore 128D extended keyboard working with UART connection to Port.A of Core, and Commodore 128 emulation is ported as well.

=====


Tuesday, May 30, 2023

Bible with 8-bit feel interface

Here is my third iteration of an eBible interface -- browsing the Bible (KJV) by electronic means.  First was a tiny 8x2 text screen on mbed NXP LPC1768 (ARM M3), second was a Nokia cell phone screen on mbed NXP LPC1114 (ARM M0 through hole package), and this third one looks very similar to a familiar 8-bit system, running in the browser.  

The third revision required no soldering, and works with desktop, tablet, mobile phone devices, anything with a modern web browser.  This current iteration builds on cbmish-script, providing the Commodore-like look and feel.  

History

Back 35+ years ago I brainstormed on how to put the Bible on a Commodore computer.  For example, with the Bible containing 66 books, I had planned to combine I John, II John, III John as one book, saving two so the book number would be 0..63 fitting in 6 bits.  Nah, that's probably silly, one byte is proper to fit the book number. But I never got that far on the Commodore.

With my first mbed based eBible iteration, I focused on being able to navigate book to book, chapter to chapter, and verse to verse.  So I built an index that was stored on the SD card, FAT filesystem.

The second eBible iteration had a different screen and used simpler block flash memory device (no filesystem whatsoever), with text, indexes, and bookmarks stored at different offsets.

Just prior to the third iteration, I restored the indexing code, porting from its original state working with mbed and linux, now to Microsoft Visual C++ on Windows.  With indexing working, I was playing around and output the Bible text to a flat JSON format now shared on github.

Then I created a few JavaScript routines to navigate the text and perform basic operations required for navigation.  I hosted the solution on StackBlitz to begin with as it is a good solution for shared web development with no local tools needed.  I just wrote some JavaScript that output very simple HTML, and it was doing something useful very quickly.  With some additional polish, it switched from outputting fixed results to populating drop down controls for the books, chapter numbers, and verse numbers, resulting in rudimentary navigation.  This solution was shared back to a GitHub repository as well, and has since been revised to work more standalone from a local file system folder in addition to being hosted on the web.

All along the way I had planned to revive my Bible on Commodore project, and the idea was to leverage my existing cbmish-script solution, which provides a Commodore look while programming in modern TypeScript.

So I set out on that journey, and saw results right away.  Almost all the bitmapped text on the screen is a link.   First the navigation was limited to book/chapter/verse, allowing selection of book, book by book selection of chapter numbers, chapter by chapter selection of verse numbers, and navigation of the text verse by verse, with back links to book, chapter, and verse selections.

Added on was an about page, stats page, link to cbmish samples, and search for words.

Links are almost everywhere

Virtually every word and number on the screen is a link.  Clicking on text will perform a search of that word showing other references to it.  One of the latest features added is being able to replace the word (or phrase) searched for, to truly make this solution interactive.

How information is accessed, efficiency

How is the latest incarnation indexed?  It is not.  Each entry has book name, chapter number, verse number, and verse text.  It is one long array of verses with this context in order.

To retrieve a specific verse, code scans the entire array for that data, returning a match.

How much data?  About 4 megabytes.  Or 6 megabytes with references per entry.  Almost 32,000 records/verses in this flat file format.

The operations involved include retrieving the book names, counting the chapters in a book, counting the verses in a specific book/chapter, retrieving the text of a verse, retrieving all the verse records for a chapter, and finding the verse records containing a specific word or word portion.

Is it slow?  No.  It just works.  Scanning the 6 megabytes of data is fine on a modern desktop computer or mobile device.  Even retrieving a list of all verses containing an "e" or "the" seems instantaneous.

I was not used to this kind of performance or memory or storage capability when originally coding Commodore or embedded development platforms.  But fast processors with lots of resources handle these tasks with ease.  It's almost like they were designed to handle big 3D virtual games and a few megabytes of text is no big deal.

Is it a waste?  Is it inefficient?  Sure, but today megabytes are measly, and cycles are cheap too.  When should we optimize for speed and energy?  Of course the answer is that it depends.  As this is an interactive application used by a single user occasionally, and performance is absolutely fine, no optimizations are necessary.  We are done!

If you are developing a multi-user system in a VM process in a server farm where you are paying for resources, you may need to prioritize your optimizations for cost, energy use (be a good steward!), and performance.

It would be easy enough to adapt the flat file into a hierarchical structure, and add indexing for words and text.  Handling this complexity is a useful skill even if the performance/processing optimizations are not at all necessary.  For now it's just useful enough to consider what effort would be necessary rather than actually performing the extra work.

Comparison with Commodore

It looks like a Commodore 64 because the resolution, fonts, colors, and behaviors are the same or similar.  

Though a port to a Commodore would require some special work including the indexing.

Storage - original Commodores didn't have megabytes of storage.  Using an SDIEC or similar may be possible, or another hard disk solution.  Another choice would be to offload to an add-on board such as ESP32 and optionally a web service.

Most Commodores didn't have a mouse back in the day, and mouse handling would require extra work too.  Additional software and hardware is required, or use of emulation.

All in all, developing the cbmish-script environment alleviates much of the resource limitations of the original Commodore microcomputer and while it may not be a technically accurate representation, it provides much of the look and feel of the original system.

Cbimsh-script technical details

cbmish-script uses multiple canvases to provide the border, background, foreground, and sprite layers which are drawn independently, and combined by the browser software.  Commodore fonts are drawn pixel by pixel with both character sets available to be displayed simultaneously.  Transparent pixels allow a lower level behind to show through (like background).

Mouse support is provided with click, mousemove, mouseleave window event handlers for the sprite (highest visible) layer.  Clickable regions and buttons are drawn highlighted (or unhighlighted) when hovered to demonstrate they may be interacted with the mouse.  Similarly they animate when clicked on a touchscreen device.  The cbmish-script system keeps track of a list of active buttons and is able to compute which ones are being interacted with.

This Bible software leverages these regions to also act as a text input field.  When the region is clicked on, it activates a bounding box for the region to limit screen updates and cursor movement to that region, exited when Enter or Escape keys are pressed, or the mouse clicks outside the region.  An onexit handler regains control and is able to grab the modified text from the screen.

Before these changes, cbmish-script had limited input capabilities.  It had operated in a display only and echo only capacity, displaying what is typed, not intelligently responding to input.

What could be added next? 

Next I should add more input and graphical capabilities to cbmish-script.  And/or a responsive mode that changes resolution and orientation with the mobile device or browser window.  Maybe add a Bible reading plan/tracker, bookmarks, multiple search terms, and a master word list.  Add another Commodore emulator to my repos?  Just ideas for now.

Links