Monday, September 19, 2022

HIRES for Vic-20 (BASIC 2.0 extension) is READY.


The BASIC commands are implemented, small font created, and demonstrations implemented.   Please enjoy this Space War and Omega Race inspired flying ship.

Source, disk image, and more details are on github for Commodore Vic-20 with memory expansion.

BASIC extension command syntax is:

COLOR [foreground[+8][,[background][,[border][,auxillary[,inverse]]]]]

COLOR [foreground[+8]] @ x1,y1 [TO x2,y2]

TEXT

HIRES xresolution, yresolution [,fillbyte]

DELAY jiffies

PLOT COLOR ON|OFF

PLOT [NOT|CLR] (@ x1,y1)|(TO x2,y2)...    **

PLOT 0|1|2|3 (@ x1,y1)|(TO x2,y2)...

PLOT "ABC" @ x,y [,addr [,width,height [,bytes]]]

RECT [NOT|CLR] [@] x1,y1 TO x2,y2

RECT 0|1|2|3 @ x1,y1 TO x2,y2

SHAPE GET|PUT|OR|XOR|AND|NOT|CLR addr @ x1, y1 TO x2, y2


** only first @ optional, when not multi-color

Monday, August 29, 2022

Vic-20 Hi-Res BASIC extension progress


Shape operations are functional, and work has begun on leveraging BASIC keyword extensions (borrowing from my own HIRES for C64).

4UPART program listing


While the SYS syntax is implemented, the BASIC keyword work has just begun.

Current vs. Proposed Syntaxes

Source and disk image are on github


Monday, August 8, 2022

Knight vs. Dragon prototype on Commodore 128


My son Ben (age 9) designed all the graphics, background and colors.  He edited the background screen strictly with inverse spaces.  Sprites were edited on the Commodore 128 with SPRDEF.  The programming manual has instructions on saving the sprite memory to disk.  And I was able to save both the text screen and colors to disk also using the dual screen capability of the Commodore 128 to enter the commands via the 80 column screen (ESC+X).  My memory is that I used MONITOR to save using hex addresses, whereas I'm showing BSAVE commands here for more symmetry with the program listing.

BSAVE "SPRITES",B0,P3584 TO P4096

BSAVE "BACKGROUND",B0,P1024 TO P2048

BSAVE "COLORS",B15,P55296 TO P56320

I wrote the BASIC demo to randomly move the characters, and flash the border red when the sprites collide.

My son and I made a great team on this project.   Thanks to his art and I am very pleased to have introduced him to the Commodore 128 and have him involved in computer animation.

Links: 

dragon.d64 disk image

Commodore 128 Programmer's Reference Guide 

Sunday, August 7, 2022

Left hand keyboard template and AutoHotKey


Back in the day (decades ago), I purchased a Matias Half Keyboard (USB) at a computer show because it was so cool.   My plan was to mouse with my right and type with my left.   There was a bit of a learning curve, and the keyboard was so tiny.  Every key was overloaded so much, I found that using function keys, hotkeys, numbers, cursor keys, etc. was too tricky.  So I ended up putting it in a drawer.   Years later I resold it on Amazon for the same price I paid.

Then years later I missed the half keyboard, want to use it occasionally.  So I looked for an alternative, and while there are other hardware half keyboard solutions out there, often they are expensive.  Even the Matias one is now listed at $595.  I paid a sixth of that long ago, but it's a niche product that only a few will need, so that figures.

A few more searches and I found that someone had created an AutoHotKey script to do the basic trick in software to make the spacebar a key modifier.   The script is straightforward and well written!

In case you don't know AutoHotKey, it is software for Windows that allows you to remap keyboard and mouse events (and other similar things) for macros, and other automation operations.  It has its own scripting language for capturing key events and performing key sends, etc.   Like you could use it to disable the Caps Lock, launch, close, and reposition your Windows on the screen, copy and paste text on the screen, and all sorts of things.

To help me learn to use this simple one-handed keyboard script, I've drawn a keyboard with Microsoft Paint, printed it out, and taped to my monitor for easy reference.   While the script supports left or right hand operation, I only drew the left hand.

Skimming the script thread, it appears others have discussed displaying a reference on the screen, so that exercise is left to the reader.

Hope this is also useful to someone else.

Sunday, July 17, 2022

Vic-20 HI-RES in progress - Memory Layout

Vic-20 Graphics Memory Layout

The Vic-20 doesn't have a native graphics mode.  But it can use a character set from onboard RAM, and double the size of character cells from 8x8 to 8x16 pixels.


A solution puts video memory at address 4096 ($1000), and character RAM at ($1000).  Notice they are the same?  Yes, there's only 5K onboard RAM in addition to color RAM.   The first 1K starts at address 0 ($0000), and the other 4K starts at address 4096 ($1000).   Regardless of any other RAM present in the system (can add 35K), only that latter 4K is accessible as video/character RAM to the video chip.  (Even if the earlier 1K is available, there's too many conflicts with BASIC and KERNAL use).

So bitmapped characters (graphics) and video RAM (characters on the screen) have to share the same section of memory.  The way bytes work, at most 256 characters could be displayed on the screen, but that would require a full 4K of RAM for their bitmaps (16*256), so something has to give.   By using only 240 characters on the screen, that reserves 16*16 = 256 bytes for video memory, and the remaining memory can be used for graphics.  For the bitmap to skip over screen memory and avoiding any overlap, the characters used on the screen are indexed starting at 16 ($10).

$1000-$10EF screen (240 bytes), values $10-$FF (16 to 255)
$10F0-$10FF unused (16 bytes)
$1100-$1FFF bitmap (3840 bytes)

BASIC RAM can be moved to either 3K expansion RAM ($400-$FFF) or 8K or greater expansion RAM ($2000 and later).

One layout that is possible is 20 characters wide by 12 characters tall = 240 characters = 160x192 resolution.

The easiest layout of characters is to store them consecutively in memory as shown above.   Character layout for the screen is left to right, then wraps to the next row.   This scheme matches color memory layout as well.   An additional advantage is that time sensitive updates to graphics can be more aligned with the raster line.

Another layout of characters is to line them up vertically as shown below.  This has the advantage that memory is contiguous vertically until advancing to the next column of 8 pixels.   This allows for optimizations in managing graphics memory at the disadvantage of working vertically instead of horizontally, thus fighting the raster line.  But color memory is still horizontally oriented, so the address calculation is different, the same as the earlier layout.

 
As the Vic-20 allows for configuring the number of character columns, character rows, and adjusting top and left margins, a variety of resolutions are possible.

Some notable resolutions include

160x192, 192x160, 200x144, 144x208, 160x160

The last is mentioned as it is the resolution used by the Super Expander cartridge.  But note it only requires 200 bytes of screen memory, so using that resolution leaves 696 bytes of onboard memory unused for graphics/screen that could be available for another use, maybe 506 bytes is still text screen memory. 

Links


Saturday, July 16, 2022

Extending C64 BASIC Part Three - Poke multiple bytes

This example accepts one address value, followed by multiple byte values appended to the SYS command on Commodore 64.  

This could be useful for POKEing to screen memory, sprite data, programmable character data, consecutive I/O registers, etc. efficiently in a single statement.


Thursday, July 14, 2022

Extending C64 BASIC Part Two - Parse 16-bit unsigned integer

This example parses a 16-bit unsigned integer appended to the SYS command on Commodore 64.  

The number is added to the jiffy clock as the alarm time, and a busy loop is entered waiting for the jiffy clock to advance to the alarm time.


Links:
ACME cross assembler (optional)
delay_jiffies.d64
open source (github)

Saturday, June 11, 2022

Slides for C64


Forget PowerPoint or Google Slides or Apple Keynote.   Here is a newer solution for the Commodore 64.   Simply use DATA statements in BASIC to define the layout of your slides.  What could be easier than that?

Links:

Saturday, June 4, 2022

easymenu64 - directory and program launcher utility for C64


I originally wrote this somewhere between 1985 and 1987.  I submitted the program and an article to Compute! publications but was rejected, probably not unique or attractive enough of a submission.  Well, here it is for the public to see approximately 35 years later.  Not sure if I wrote this originally in assembler, or just machine code.  I suspect I used machine code for this one.  I have done a fair job now disassembling and crafting into assembler (using ACME cross assembler) for a more modern experience.

My typical use was to either see what was on the disk, or as a game launcher.  Imagine the possibility of many games packed on a 1581 disk.  It even supports launching cartridge images.

I have used it with 1541/1571/1581 but not sure if it works with fully populated large drives.  Seems to have trouble with some non-standard drives.  I plan to review that in the future.  (Update: some fixes have been applied to the original code starting with tagged version 1.1)

Keyboard and joystick(#2) controls are documented with the source README.

Links:
    open source
    easymenu.d64 (disk image)

Wednesday, May 25, 2022

Extending C64 BASIC Part One - Parse String

This example parses a string appended to the SYS command on Commodore 64


Links: 
reverse.d64 (updated 2022-05-29 to include source and example startup)
open source (github)

Saturday, May 14, 2022

GO 128 enhancement for Commodore


One wonderful feature of the Commodore 128 was its compatibility with the Commodore 64.  It was an evolution of the Commodore 64 and still supported all the software and hardware from before.  For me it was a no-brainer to buy.  80 columns, plus new features, plus CP/M.   Adding a mouse, GEOS 128, REU 512K, and 3.5" floppy, and I thought it was the best place to be this side of heaven.

There were multiple ways to go into Commodore 64 mode.

  1. Start with a Commodore 64 cartridge
  2. Boot/reset with the Commodore key held
  3. Commodore 128 boot disk that switched to Commodore 64 mode
  4. Switch MMU to Commodore 64 mode
  5. GO 64 command
But the only way to get back into Commodore 128 BASIC 7.0 was to reset the system.


Fast forward a few decades or so, and now we can add GO commands to the other BASIC systems to switch between them.  Links: cross-platform source, Windows binary release.

How does it work?  This is emulation.  Sorry purists.   The Commodore 128 MMU was built so there is no going back out of C64 mode.  This was by design to keep 64 mode on the 128 very close to 100% compatibility.  But emulation?  Anything goes.  The GO command is hooked, the argument is checked for a number, and if the number is right, it goes to that Commodore model by restarting the emulation for that system.  And thus, when running the BASIC for one system, can quickly switch to another other system (or even reset the system) using the GO command.  It even prompts for amount of RAM to allocate (except 128 is fixed at 128).

PET 2001 2K to 64K supported 
Vic-20 5K to 40K supported in hardware supported increments, not all available to BASIC
64 RAM 3K to 64K supported not all available to BASIC
Commodore 16 and Plus/4 support 16K, 32K, or 64K
Commodore 128 fixed at 128K (KERNAL does not do RAM test) 

Limitations?  Oh, sorry.  This emulator is text only.  No full screen editor.  Doh!   No screen pokes either (well not displayed).  [Update 6/2021:] PETSCII and commodore graphics characters supported with third party font.  Does support console history editor on Windows.   Linux and MAC builds (you can build from my open source project) provide only simple line editing capability.   Does provide accurate 6502/6510/8502 emulation, RAM banking, etc. according to the platform.   So pop into the MONITOR on C128 or C16, Plus/4, or SUPERMON on other platforms to write and edit machine code.   And because using console window, the text display size is not as limited, 88 columns for Vic-20 and 160 columns for C128.


Save and Load from .PRG is supported as well (except PET at this time, some other limitations).  Disk device is ignored, so defaults to local file system.  Even use absolute and relative paths.

So for simple programs, and just playing around in BASIC, it's not too bad.   Text background and foreground color for Vic-20 is enabled because that color palate is more compatible with the Windows console default colors.  Reverse text should work on all systems.  Home, clear, cursor positioning may work in programs only, not for editing.


Now prompts for RAM size going to 64


Going to Vic-20 from 64


Going to PET 2001 from Vic-20


Going to Plus/4 from Vic-20

Going to Commodore 16 from Plus/4


Going to 128 from Commodore 16

Resizable text console - 132x50 text screen on Commodore 128

Bil Herd, Ted/C128 hardware design project lead (left) and Dave Van Wagner, geek (right)


Links: 

Wednesday, May 4, 2022

C128 model support added to simple 6502 Commodore emulator

The Commodore 128 is a favorite system of mine.  I've owned a DCR model (cost reduced with embedded disk drive, the metal case) since around 1987.  And it still works fine!

But this article is about emulation.  I already wrote a C#/.NET based emulator that supports PET/Vic-20/64/16/Plus/4, and just recently have added 128 support.   I thought it would be difficult with the C128 custom MMU and VDC.  There was a learning curve.  And I faked enough of it to boot and work (even with no Z80).


This simple emulator is a text based emulator run from a console window.  It provides only text input and output, in addition to LOAD/SAVE support to the local disk as .PRG files (just a common extension for Commodore program files, unformatted binary data). 

Feed the emulator some Commodore ROMs (not included, recommend grab these from Vice) and it can map ROM/RAM into the 6502 memory space and execute 6502 instructions. There are some common KERNAL entry points for character in, character out, check for stop, and load/verify/save operations.   These calls are hooked to redirect console input/output to the emulated 6502.  Effectively the Commodore computers are running in software.

These emulated systems don't do the fancy video games.  There is a long list of things they don't do, including no PETSCII graphics either.  No graphics.  No sound.  No timers.  No color.  They don't even do full screen editing.  They are stuck using the console editing features.  Not great, but it works -- cursor up to recall a previous command in the current screen line editor.  And the Windows console editor even survives restarting the program or restarting the Commodore.  Please note it is best to use Caps Lock as the Commodore expects uppercase commands most of the time.

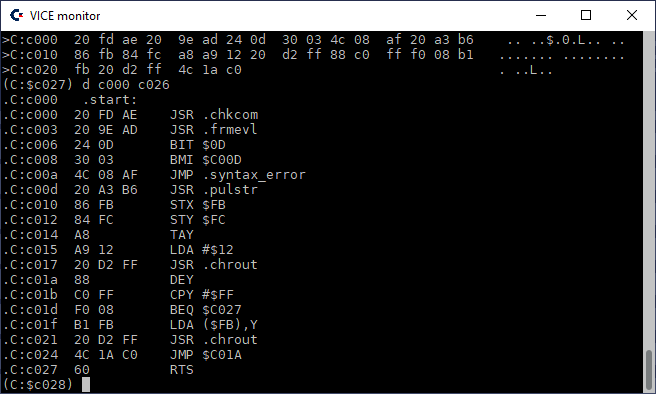
What this does function as is a good text BASIC interpreter, and 6502 machine language environment.   Some of the Commodore systems such as the C128 and Plus/4 include their own machine language monitor (MONITOR command).  On the PET, Vic-20, and C64, you can load the appropriate SUPERMON for that system.


Since we're using a Windows console in this case (or Linux or MAC... .NET supports them too!), it can be sized to screens larger than 40x25 as well.  Imagine the capability of full screen text written in BASIC!   Or a long disassembly listing in the monitor.  Wow!

Here's how to get started.

1. Grab the sources from github

2. Grab the roms from vice, (a much larger more complete and more accurate emulator, but why would you want that much fun?).   Put these in a c128 directory from which you will run the simple emulator.  While you're at it, create subdirectories and copy roms for the other systems too.

c128: kernal, basiclo, basichi, chargen

c64: kernal, basic, chargen

vic20: kernal, basic, chargen

ted: kernal, basic

pet: basic1, edit1g, kernal1

3. Compile using Visual Studio or dotnet.

4. Run with the command line argument: c128


Why do this?  To me this was a challenge to first emulate the 6502, and a challenge to minimally support Commodore BASIC.  I thought what is the least amount of support that is needed to have a useful Commodore computer?  I knew about the Kernal jump table definition by Commodore.  I had seen others do it successfully.  And I wanted to do it my way.   It was just a mountain to climb, and since I love 6502 and Commodore computers, it is an enjoyable part of my hobby.


What's next?  Probably more blogs and videos documenting and demonstrating this stuff.  My goal is to help others learn and in this case specifically enjoy Commodore systems.   The source code is open so you're free to inspect and modify it (giving credit where credit is due of course).