Thursday, December 23, 2021

Trace C64 I/O Kernal Jump Table Calls

See what your C64 programs are up to!   Debug, or help transition from BASIC to assembly language I/O programming.

c64-io_monitor is a program that allows monitoring or tracing input/output calls on the Commodore 64.  It can show counts or a trace log of what calls have occurred.   

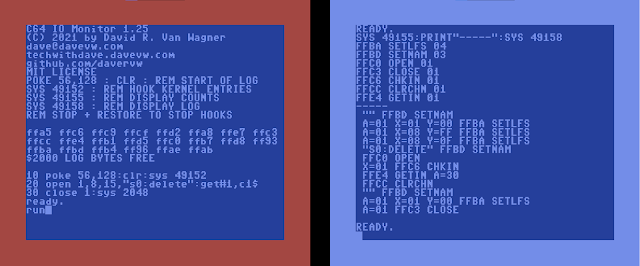
The screenshots show the initial copyright screen, with usage hints, and status (includes trace log bytes available), followed by an example program, and the counts and trace log from running this program.

Basic usage includes loading io_monitor program from disk at absolute address $C000.   It is recommended to lower BASIC by poking to memory address 56 (e.g. POKE 56, 128).  Then NEW to both clear variables and reset BASIC program pointers.  And use SYS 49152 to initialize the trace/monitor.

    LOAD "io?monitor",8,1
    POKE 56,128
    NEW
    SYS 49152 : REM START MONITOR

The monitor copies BASIC/KERNAL ROMs to RAM, patches them to hook the I/O entry points in the Commodore 64 kernal jump table at the end of ROM within the $FF00-$FFFF range.  The hooks take care of counting calls, and logging trace information in available RAM.  While each call is made, the border color is incremented to show it is working.

At this point, you may make any I/O calls including keyboard input (plus RETURN), screen output, disk/tape I/O, etc.   The I/O calls will be counted/logged.

When you are finished with the monitoring session, it is recommended to press STOP+RESTORE to reset back to the KERNAL ROMs, then the counts and tracing is turned off.

Counts can be displayed with SYS 49155, and the trace log can be displayed with SYS 49158.

The trace log can be sent to a file with statements like the following:

    OPEN 1,8,3,"@0:TESTLOG,S,W"
    CMD 1
    SYS 49155: REM COUNTS
    SYS 49158: REM VIEW LOG
    PRINT#1
    CLOSE 1


Why did I create this?  I have been developing some simple (text only) 6502 Commodore emulators (one, two, three, four, five) for multiple targets (web, Windows console/terminal, Linux terminal, Mac terminal, Arduino UART, ESP32 UART, Teensy LCD, STM32F4 LCD, and more embedded targets) and am looking at supporting file I/O emulation (open, input, get, print, close, etc.) above and beyond my D64 emulation.  One step along the way is understanding Commodore I/O some more from the machine language level.  Seeing a trace log provides a closer in-action view of the kernal I/O routines.


Links

The D64 disk image contains the machine code for io_monitor (also available as PRG), and some sample programs that can be used to demonstrate the functionality, including viewlog which opens and displays a sequential file (e.g. testlog saved to disk like above).  The source code posted to github is open source (MIT Licensed meaning free to use/alter/distribute, giving credit where credit is due, with no warranties).

Hackaday linked to this article

Sunday, April 25, 2021

Low Resolution Graphics for Commodore

Commodore systems come with a graphical character set that can be used for low resolution graphics.

PETSCII low resolution 80x50 example

All the Commodores include block patterned graphics that can be used to display 2x2 pattern blocks, to double both the horizontal and vertical text resolution, for example from 40x25 to 80x50.  Like 4K for the day!  

PETSCII block characters including inverted

In the back of our high school math classroom was an original PET 2001.   This system had a chicklet keyboard, built-in cassette drive, and 40 column white on black monochrome screen.  This system has no graphics modes beyond the PETSCII capabilities.

One of the exercises in my Algebra 2 class was to graph mathematically functions.  I successfully challenged myself back then to plot the graph on the PET using this block graphics method.

Using 8 PETSCII characters, and the inverse of those characters, all 16 combinations of the patterns can be achieved by setting (POKE) the correct value onto the screen (see the A array in the source).  Also achieved is reading (PEEK) the current PETSCII value, converting that into pixel data, and combining existing plotted pixels with a new pixel (see the B array in the source).

LORES PET 40COL listing

My handwritten PET listing from 1982

I found my handwritten program listing that dates back to 1982.  It's beautiful to see that graphics could be achieved with PETSCII with only a few lines of code.  From my positive experiences with the PET, I purchased a Commodore Vic-20, and the Super Expander later in 1983 and switched to high resolution graphics at that point.

A disk image (D64) of samples for PET/Vic-20/C64 is available.  Screen memory locations for PEEK/POKE are different for all the systems, and sizes are adjusted with variables for the 80 column PET, and 22 column Vic-20.  The Vic-20 and C64 also have color memory, so an additional POKE is included to match the current text foreground color (PEEK(646)).  

Update [5/13/2022] there are ports for both Commodore 128 40 column screen, Commodore 128 80 column screen (including SYS calls to read/write VDC 8563), and a port to the TED (C16, Plus/4) series systems showing a color gradient possible with those systems.

Disk Listing for different Commodore Models

Vic-20 low resolution 44x46 plot

Contrast with 320x200 high resolution from C64

PET 80 column screen 160x50 sample

[Change:] 80 P=COS(I)*SIN(I)*2

Commodore 16, Plus/4 screen 80x50 sample (TED)

Monday, February 22, 2021

C64 Emulator for Teensy 4.1 LCD/USB/SD(D64)


Here is my Teensy 4.1 on a breadboard pretending to be a Commodore 64.  USB keyboard, color text, background, border, and D64 (1541 image) support for LOAD/$/SAVE.  6502 emulation supports machine language, and Commodore 2.0 BASIC programs.   Sorry text only, no games, no graphics, no sound, no joysticks, just simple stuff for now.  But that simple stuff works! (mileage may vary, lightly tested, please try this at home under controlled conditions).


Sunday, January 17, 2021

How to Build Vice 3.5 (x64sc, etc.) on Raspberry Pi 400

Raspberry Pi 400


The Raspberry Pi 400 invokes a sense of nostalgia back to the all-in-one systems of the past, such as those commonly available in the 80's (about 40 years ago!) of having the keyboard and computer all in one, with connections at the back of the enclosure, and expansion at the back of the enclosure.

My favorite system released January 1982 was the Commodore 64.

So why not have both?  With emulation, let the Raspberry Pi 400 become a Commodore 64 as well.

Vice 3.5 built, running on Raspian

One way to do this, is using Vice (the Versatile Commodore emulator).  Of course you can use a prepackaged solution like Retropie and Emulation Station.  But since it is open source, you can also just download and build the source yourself.

As vice 3.5 was just released Christmas Eve, 2020, it makes a lot of sense to build yourself, so you can have the latest build relatively easily.  Just think of all those new features!!!

I've attempted this myself on my Raspberry Pi 400 (and expect should work on others fine too) with Raspian.  I've tested with both the latest 32-bit ARM, and beta 64-bit ARM builds.

Following are the steps I took to accomplish building the default configuration.  I followed the basic instructions, and when configuration or build failed due to a dependency, researched the dependencies necessary (thanks Google and all those who have built before me and posted their solutions).  

Grab yourself your favorite beverage, power up your Pi, and get building!   And once you're done, feel free to test my hires.d64 image.  Maybe even pick up some keyboard stickers.   And also can run Pet, Vic-20, Commodore 128, etc.

Summary

  1. Install dependency packages
  2. Download three archives from web: vice 3.5, SDL2, SDL2_image
  3. extract the archives to their respective directories
  4. configure, build, and install each iteratively in the order: SDL2, SDL2_image, vice 3.5
Full Steps (note versions may change, these were the ones available January 2021):

  • sudo apt-get install flex bison xa65 libgtk2.0-dev texinfo libxxf86vm-dev dos2unix libpulse-dev libasound2-dev
  • sudo apt-get install texlive-latex-base texlive-fonts-recommended texlive-fonts-extra texlive-latex-extra